مجازی سازی دسکتاپ با نرم افزار Horizon View 6.0 – بخش سوم
پیکربندی Horizon View Administrator و دیتابیس و تنظیمات vcenter و AD
همانطور که در مراحل قبلی مشاهده فرمودید ما یک سرور View Connection نصب کردیم و نرم افزار View Composer را بر روی سرور vCenter نصب نمودیم.
ما در اینجا باید سرویس اکانتهایی برای View ایجاد کنیم تا بتوانند به سرور vCenter متصل شده و بتوانند دسکتاپها را به دامین کنترلر Join بکنند.
دیتابیس مربوط به لاگ گیری را ایجاد خواهیم نمود و همچنین در مراحل کار نیاز به ایجاد یک OU و تعریف یک دسترسی Delegate بر روی این OU خواهیم بود.
اگر شما نیاز دارید تا با کلیه مراحل راه اندازی VMware Horizon View 6.0 بیشتر آشنا شوید می توانید از مقالات زیر استفاده نمایید:
- مجازی سازی دسکتاپ با نرم افزار Horizon View 6.0 – نصب سرور Horizon View Connection
- مجازی سازی دسکتاپ با نرم افزار Horizon View 6.0 – نصب Horizon View Composer
- مجازی سازی دسکتاپ با نرم افزار Horizon View 6.0 – پیکربندی Horizon View Administrator و دیتابیس و تنظیمات vcenter و AD
- مجازی سازی دسکتاپ با نرم افزار Horizon View 6.0 – ایجاد یک Template از ویندوز 8.1
- مجازی سازی دسکتاپ با نرم افزار Horizon View 6.0 – ایجاد Automated Desktop Pool با Linked Clones
- مجازی سازی دسکتاپ با نرم افزار Horizon View 6.0 – ایجاد RDS Host و Application Pool
- مجازی سازی دسکتاپ با نرم افزار Horizon View 6.0 – ایجاد یک RDS Desktop Pool
1- اکتیو دایرکتوری خود را باز نموده به نرم افزار Active Directory Users and Computers می رویم.
2- ابتدا یک OU که در برگیرنده دسکتاپهای مجازی خواهد بود ساخته می شود. پیشنهاد می شود یک OU کاملا مستقل برای دسکتاپهای مجازی ایجاد شود. استفاده از OU های موجود که دسکتاپهای فیزیکی نیز داخل آنها می باشند و یا حتی ایجاد یک OU Child در داخل OU اصلی می تواند باعث مشکلات GPO Scope در آینده شود.
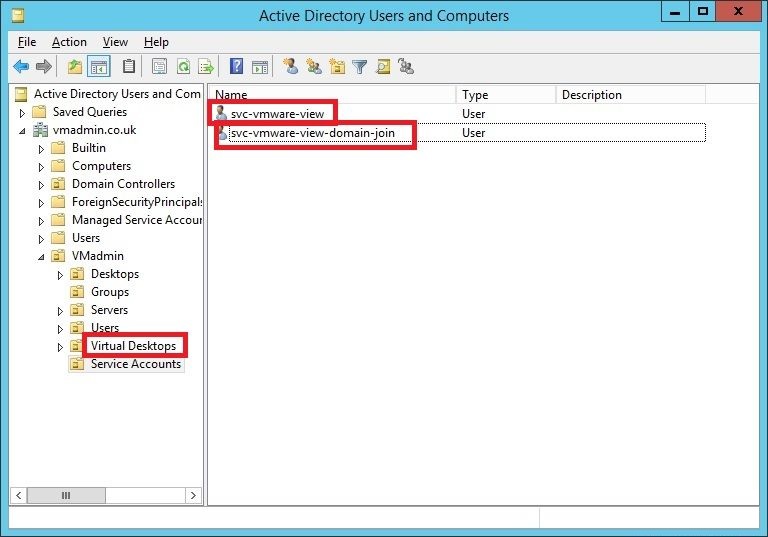
3- سه کاربر جدید در اکتیو دایرکتوری ایجاد می کنیم:
svc-vmware-view-domain-join
این اکانت در OU ما ایجاد خواهد شد و توسط View Composer برای Join کردن دسکتاپهای مجازی به دامین کنترلر استفاده خواهد شد.
svc-vmware-view
این اکانت توسط سرور View Connection و برای متصل کردن سرور vCenter به تخصیص و مدیریت ماشین های مجازی استفاده خواهد شد.
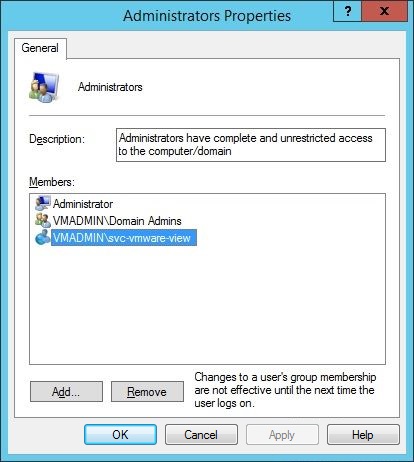
4- اکانت svc-vmware-view را به گروه Local Administrator های سرور vCenter اضافه می کنیم.
این کار برای View Composer مورد نیاز می باشد و در صورتی که شما از View Composer استفاده نمی کنید نیازی به اضافه نمودن اکانت به گروه Local Administrator های سرور vCenter نخواهیم داشت.
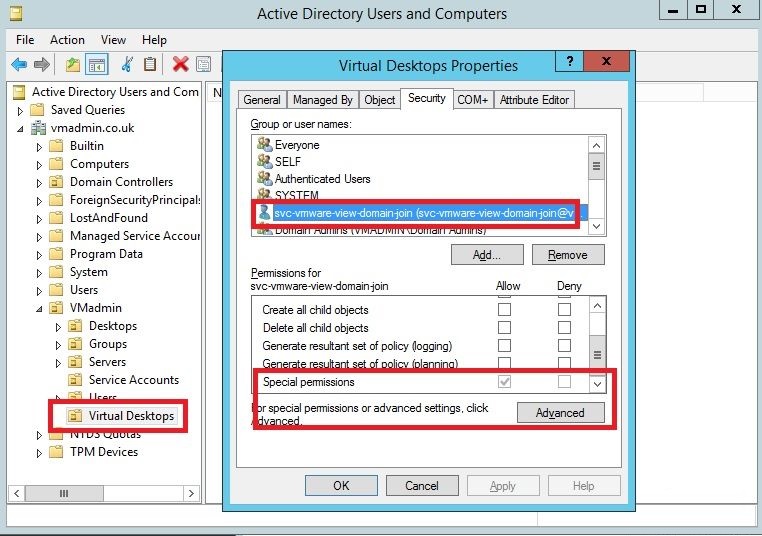
5- در اینجا باید یک Delegate به اکانت svc-vmware-domain-join در OU مربوط به دسکتاپهای مجازی ایجاد کنیم. با این کار اکانت می تواند Object های کامپیوترها را در OU اصلی مان ایجاد نماید و حتی اگر Child OU دیگری از دسکتاپهای مجازی با Desktop Pool جداگانه در داخل OU اصلی ایجاد شود این اکانت می تواند این Object ها برای آنها نیز تولید کند.
Permission های مربوط به این دسترسی به شکل زیر می باشد:
Under Permissions Tick: List Contents, Read All Properties, Write All Properties, Read Permissions, Create Computer Objects and Delete Computer Objects
Under Properties Tick: Write All Properties
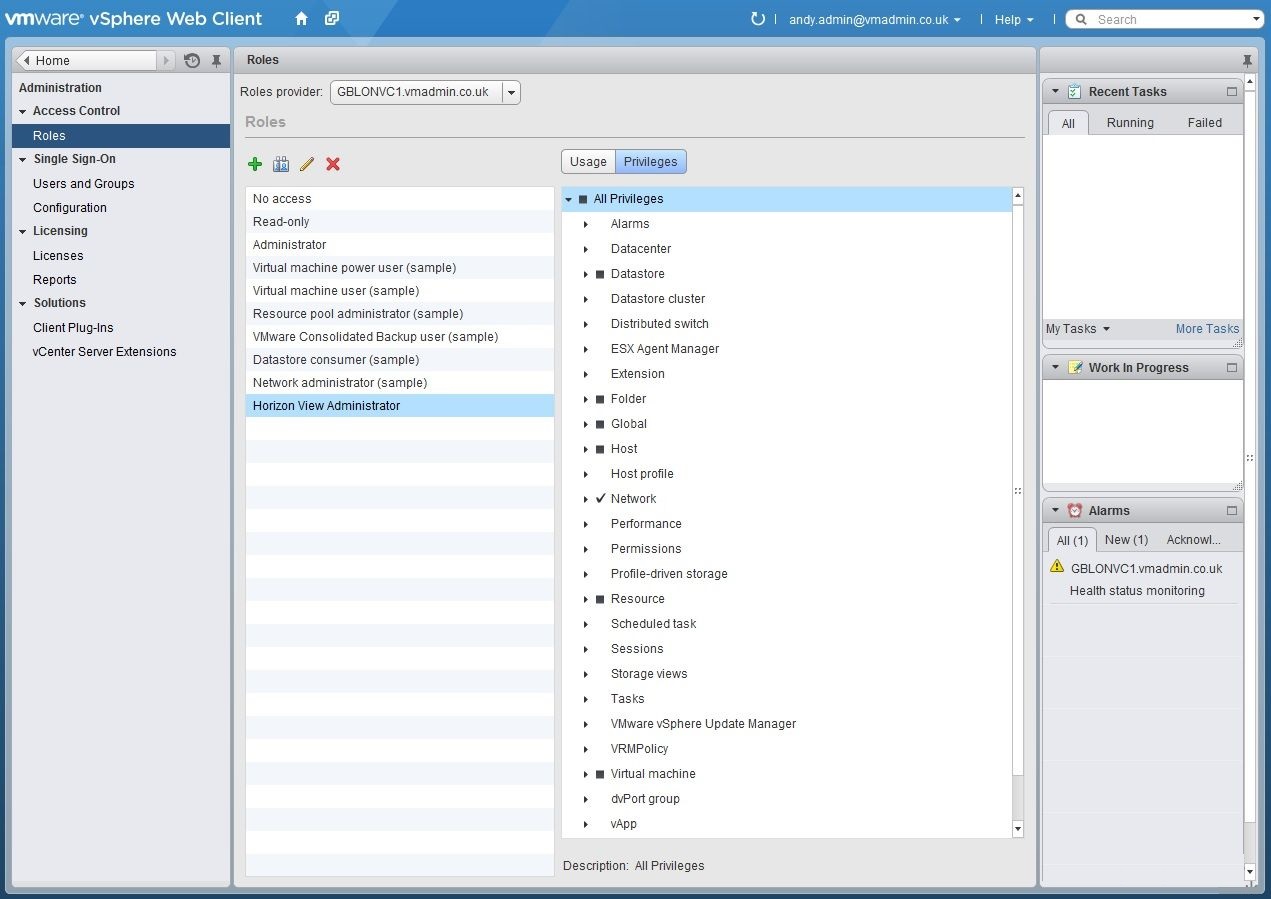
6- یک vCenter Role برای View ایجاد می کنیم.
با نرم افزار vSphere Web Client لاگین می کنیم.
به قسمت Roles طبق آدرس Home –> Administration –> Access Control –> Roles می رویم.
یک Role جدید با نام View Administrator با Privilege های زیر ایجاد می کنیم :
Privileges Required for the vCenter Server User
View Composer Privileges Required for the vCenter Server User
برای مشاهده کلیه داکیومنتهای منتشر شده توسط VMware در حوزه VMware Horizon View 6.0 به لینک زیر مراجعه فرمایید.
VMware Horizon View 6.0 Documentation
توجه: شما می توانید از Role Administrator موجود برای View استفاده کنید ، اگرچه اکانت Administrator یک سری دسترسی های بیشتری دارد که سرویس View نیازی به آنها ندارد.
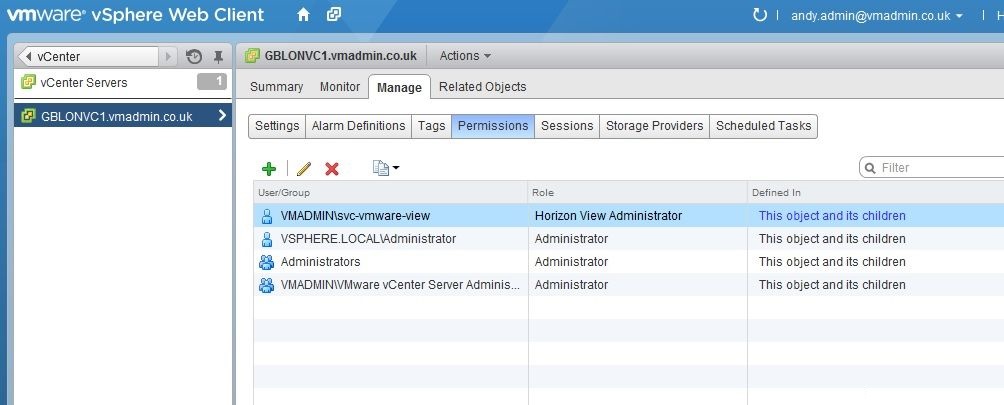
7- تنظیمات مربوط به Permission های اکانت svc-vmware-view در سرور vCenter انجام می گیرد.
Object مربوط به vCenter Server در vSphere Web Client را انتخاب می کنیم.
بر روی تب Manage به قسمت Permissions می رویم.
از طریق رول View Administrator که قبلا ایجاد کرده ایم دسترسی های اکانت svc-vmware-view را تعریف می کنیم.
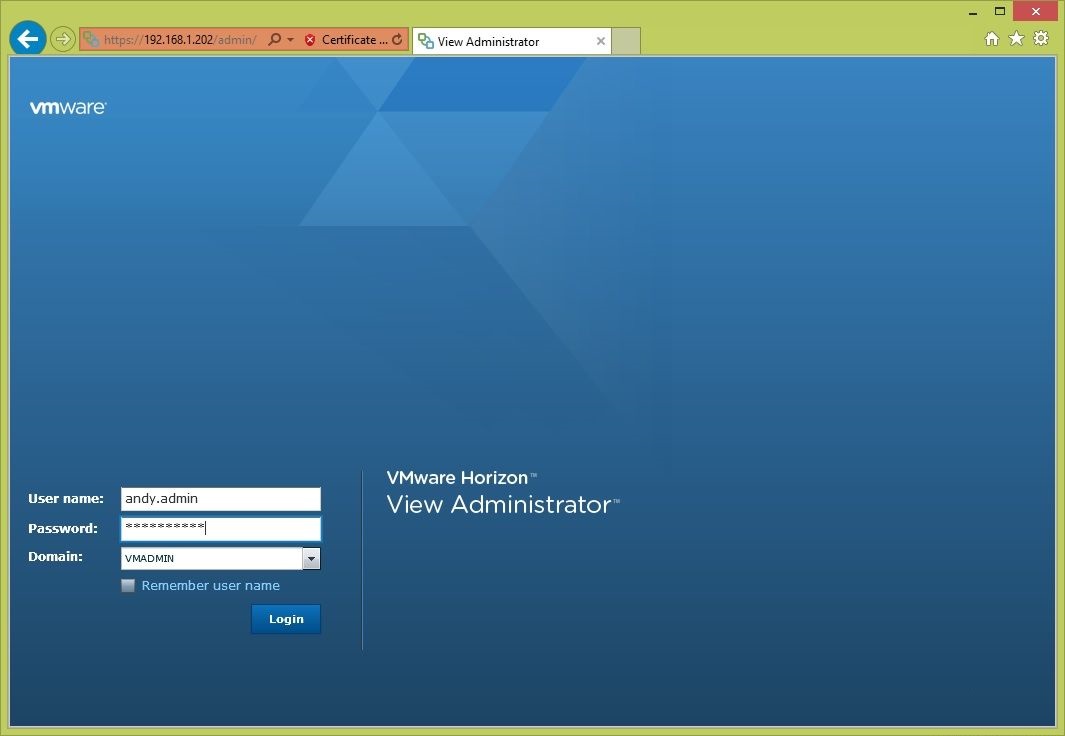
8- به View Administrator با آدرس زیر لاگین می کنیم.
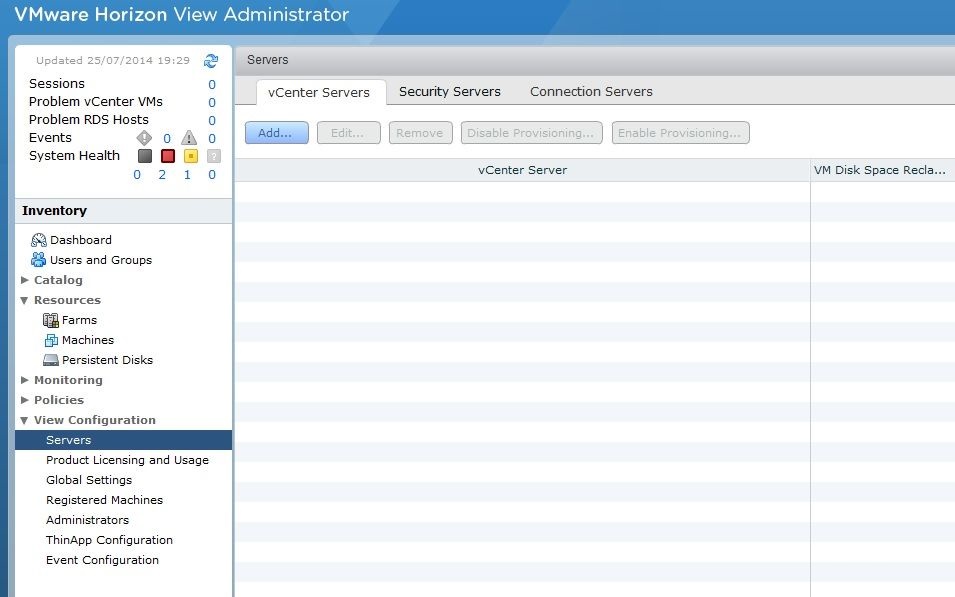
9- سرور vCenter را به View اضافه می کنیم.
در قسمت View Configuration به قسمت Servers و vCenter Servers می رویم و سرور vCenter را اضافه می کنیم.
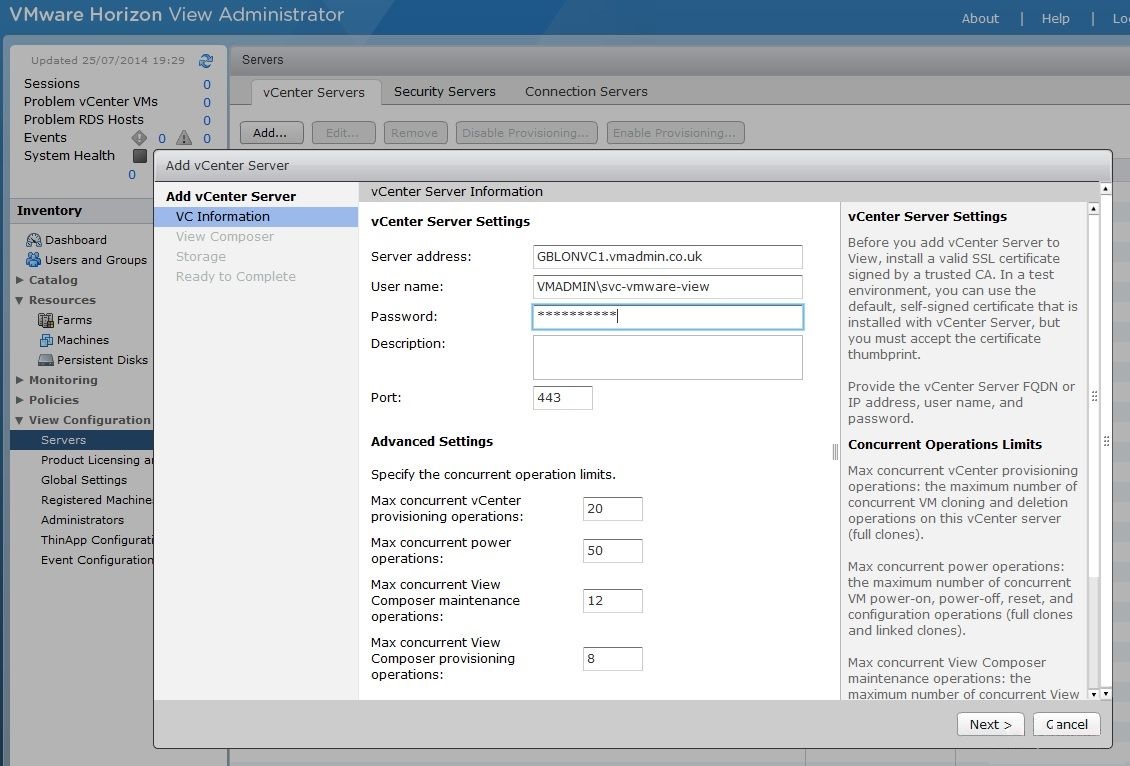
10- آدرس IP یا نام FQDN سرور vCenter را وارد می کنیم.
جزییات سرویس اکانت svc-vmware-view را وارد می کنیم و عملیات همزمان Provisioning بصورت پیش فرض حفظ می کنیم.
Certificate ارائه شده توسط سرور vCenter را می پذیریم.
11. Enable View Composer
We installed View Composer on the vCenter server earlier in part 2 which will enable us to create linked clone desktop pools.
Select “View Composer co-installed with vCenter server”
Accept the certificate presented for View Composer.
Note: The account View uses to access vCenter server (svc-vmware-view) must be a member of the local administrators group on the vCenter server otherwise it will be unable to connect to View Composer.
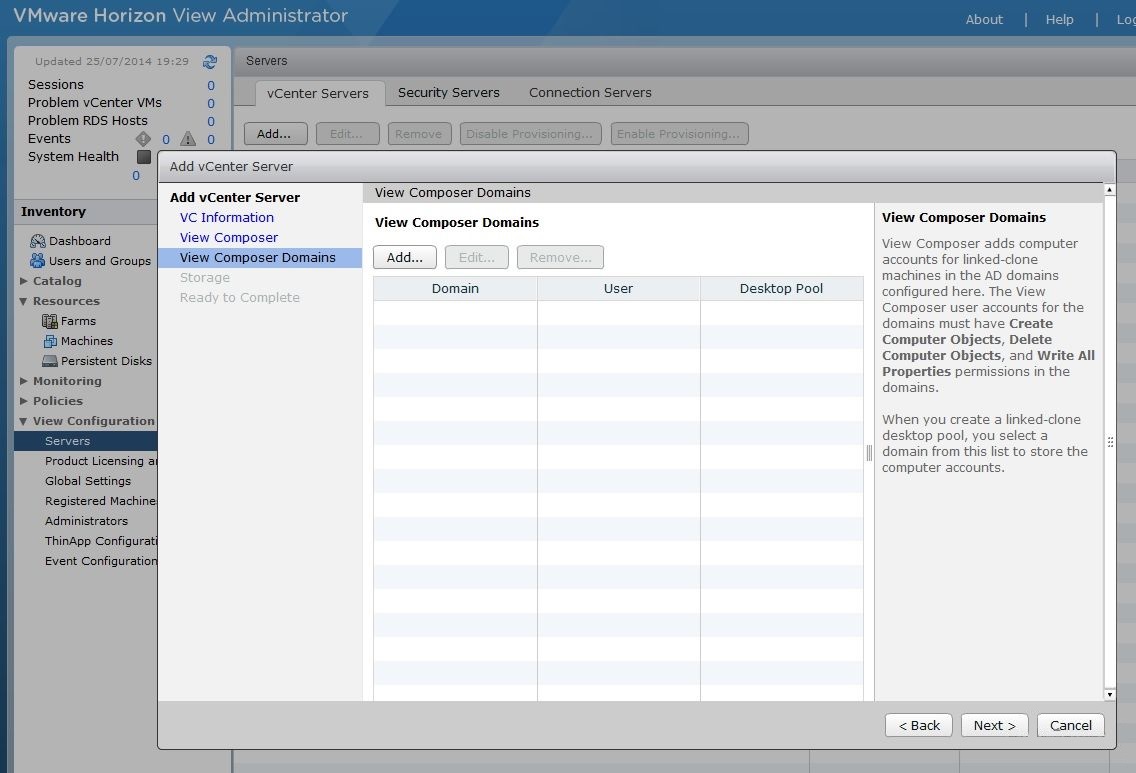
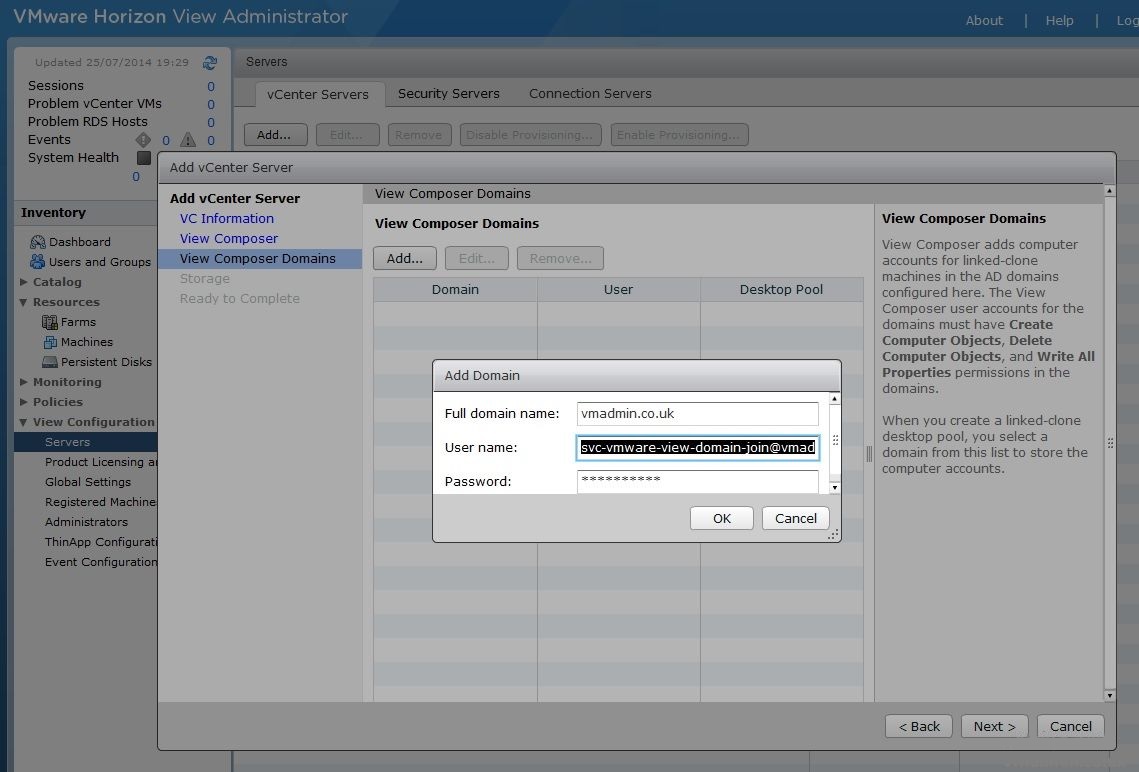
12. Add a domain which View composer will join desktops to.
Click Add.
13. Enter the full domain name (i.e. not just the NETBIOS name)
Enter the user account details created earlier to join desktops to the domain.
Tip: Remember this user account must have appropriate permissions to create computer objects within the required OUs of the domain.
Note: I’m using the UPN format for the username because the account name I made is quite long and cut short based on the older Windows 2000 format
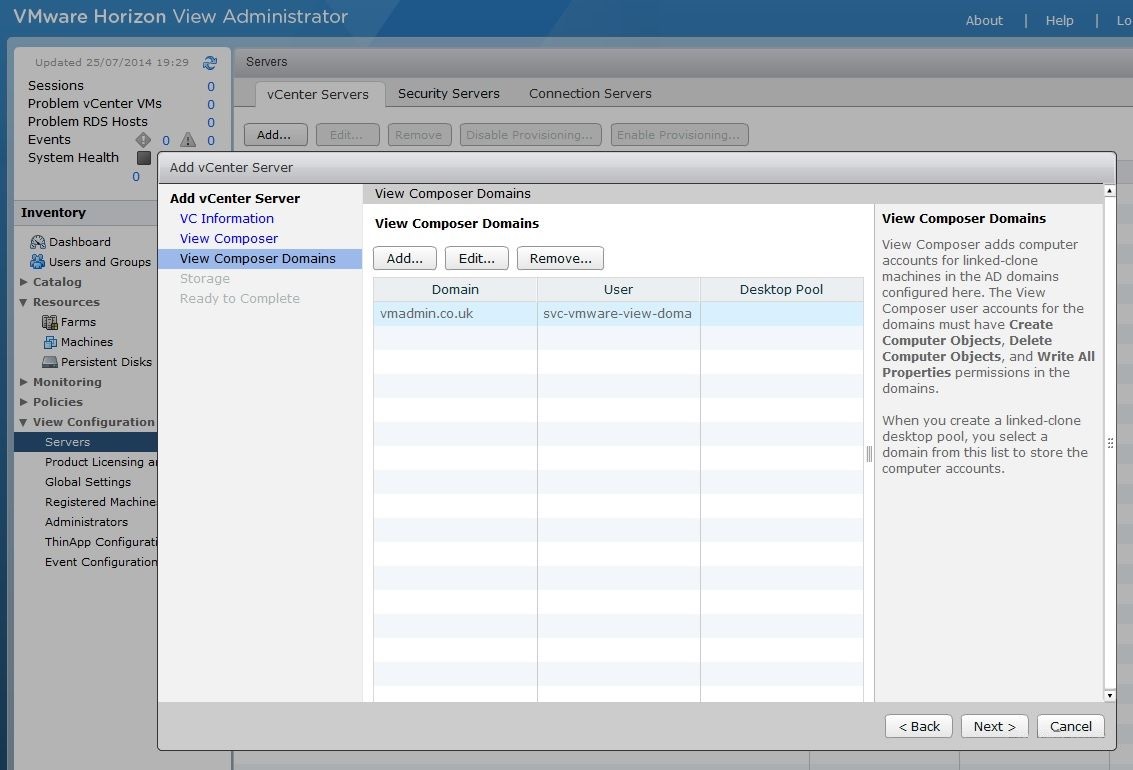
14. Once added the domain will be listed within the View Composer domain below.
You can repeat this for any additional domains (such as trusted domains) which you may need to join desktops to.
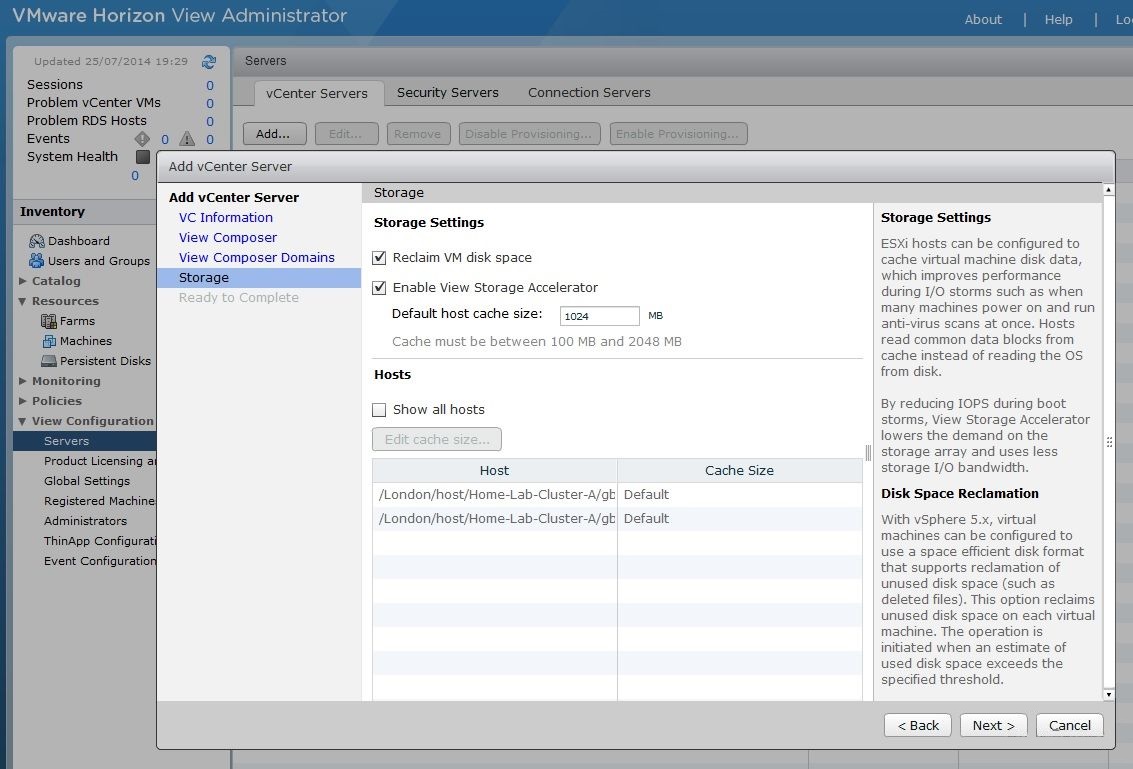
15. Enable View Storage Accelerator and Reclaim VM disk space
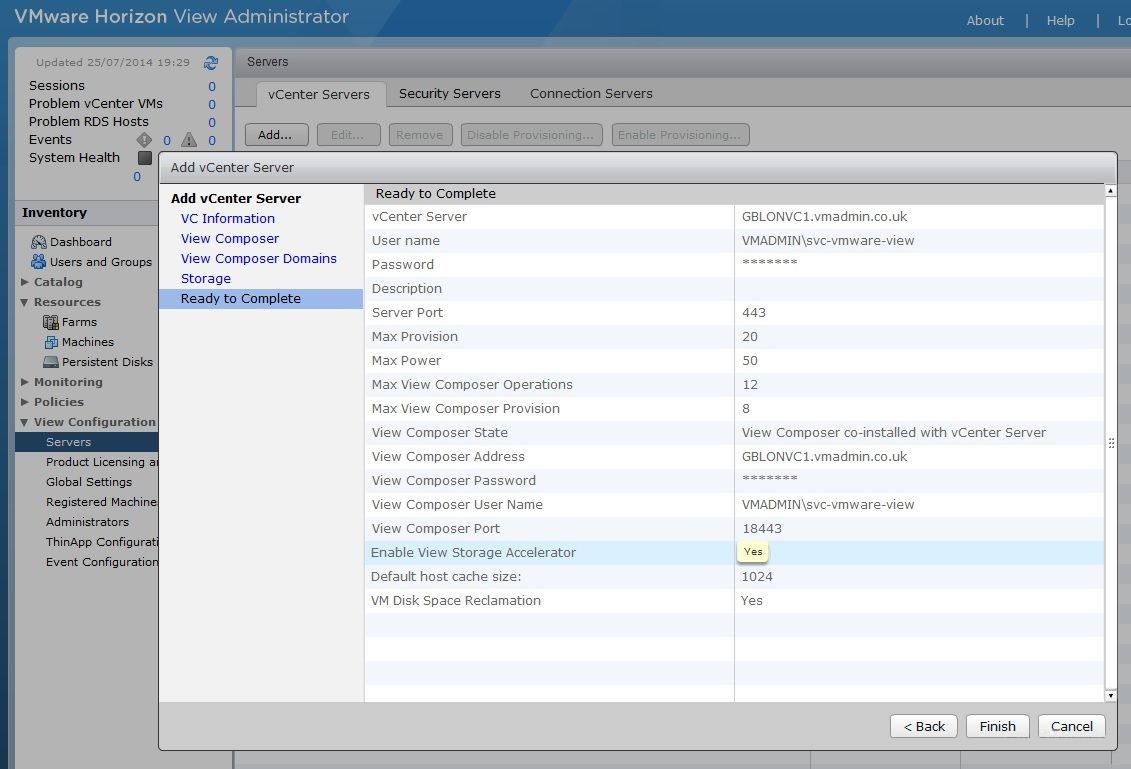
16. Review the settings and Click Finish to add the vCenter server to View Administrator
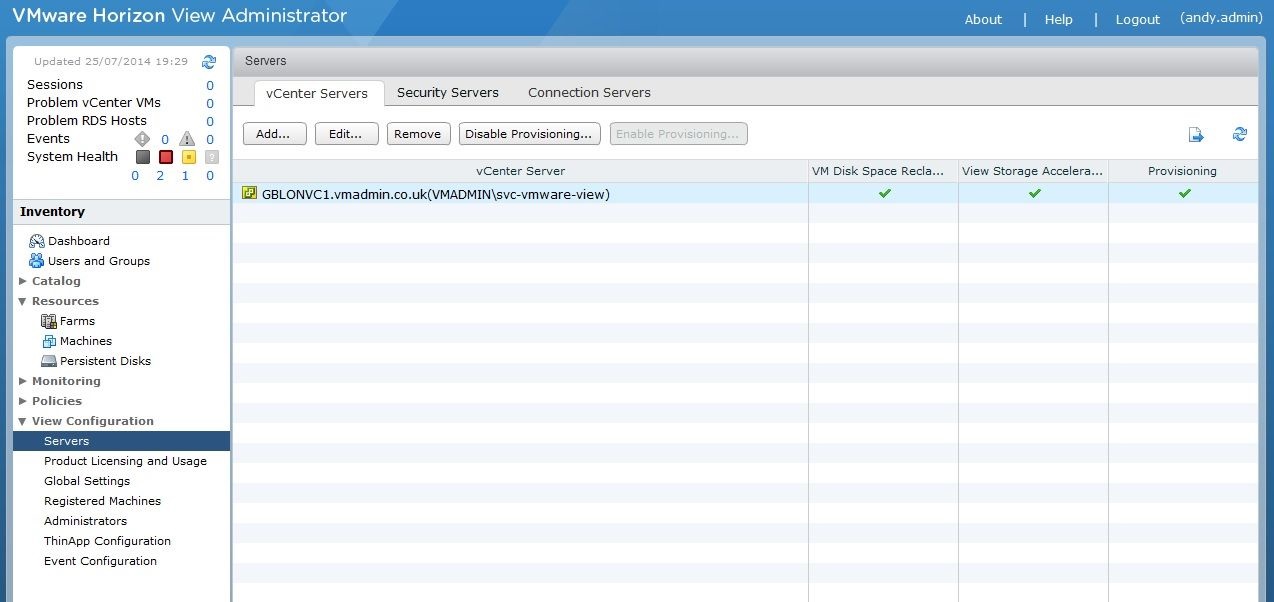
17. Confirm the vCenter is listed within View.
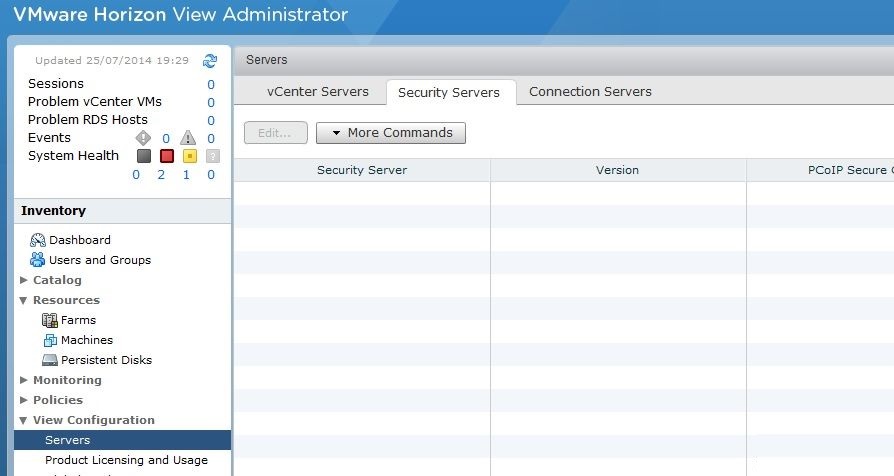
18. Click on the Security Servers tab.
If View Security servers are added later this is where they will appear.
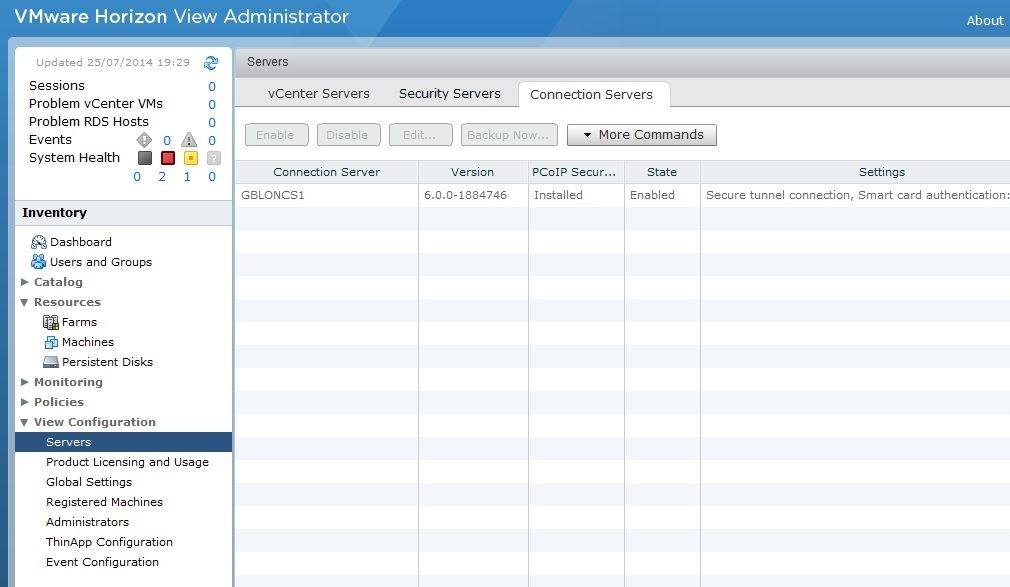
19. Click on the Connection servers tab.
You will see the single View Connection server we have installed listed.
Any additional View connection servers will appear here as they are installed and added to the View Pod.
From here the individual connection servers are configured.
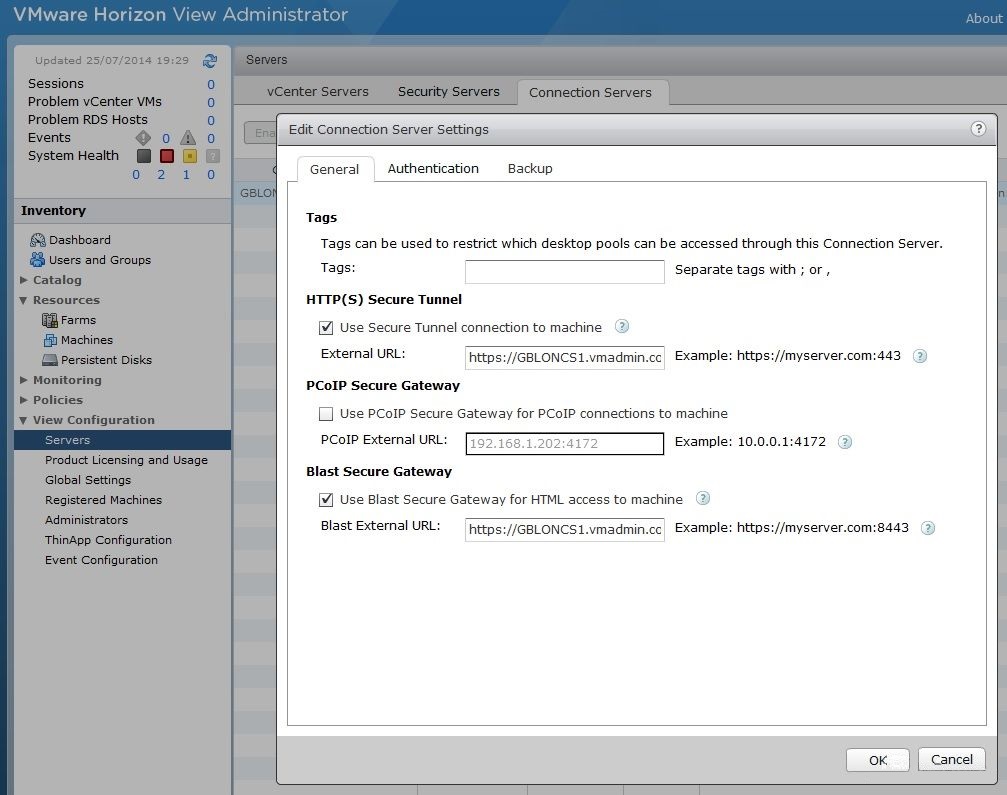
20. Click Edit and review the Connection server settings.
By default the HTTP(S) and Blast secure tunnels are enabled and the PCoIP secure gateway is disabled.
If the secure tunnel is enabled, connections from clients to virtual desktops are tunnelled via the View connection server.
When disabled, connections from clients are direct to the virtual desktops. By having the secure tunnels disabled this reduces the load on the connection server but another benefit is that if the View connection server fails or is updated/rebooted clients are not disconnected from their desktop.
21. Disable all the secure/gateway tunnels so that clients connect direct to their virtual desktop.
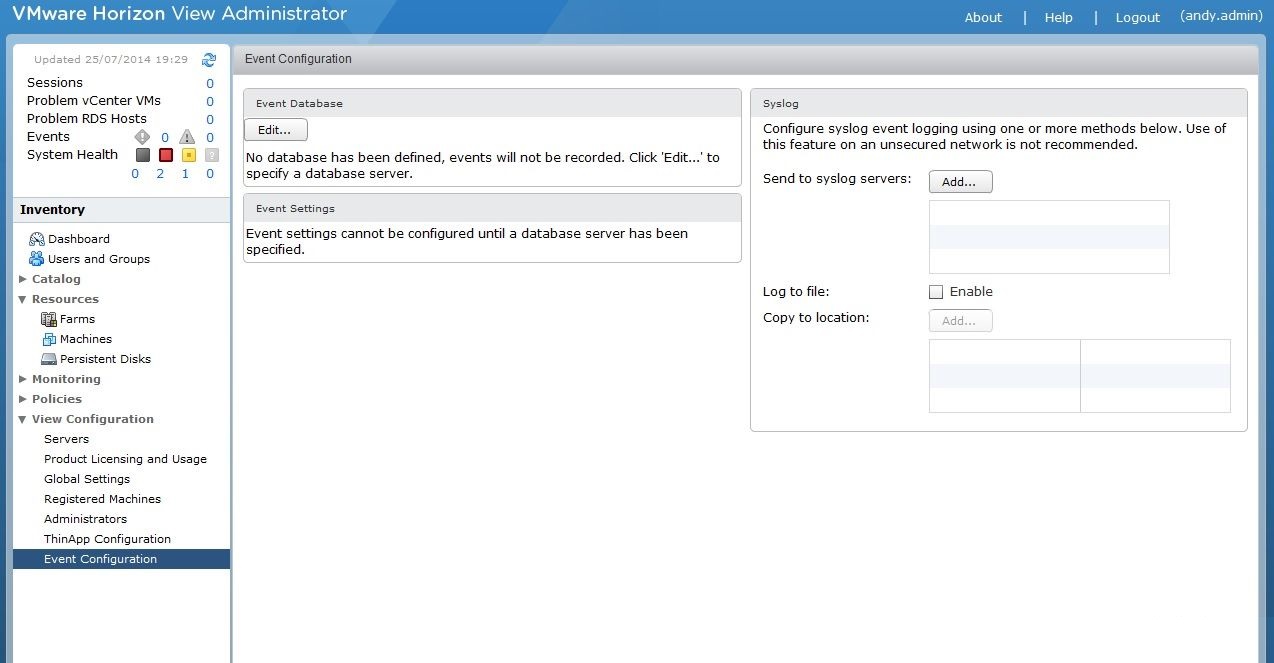
22. Configure the View events database.
The View events database is a SQL database which stores information for events such as auditing of administration changes within View administrator, problems connecting to components and services such as Composer or vCenter and also user events such as connecting to a desktop.
The View events database makes it possible to troubleshoot problems which otherwise would require looking at the verbose log files.
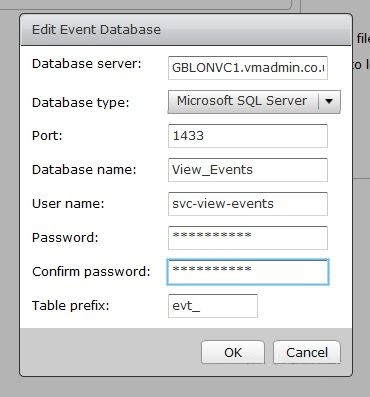
23. Enter the FQDN and port of the SQL server
Enter the Database name followed by the username/password for the events database
Note: It is recommended this is a dedicated database, however you could use an existing database such as the vCenter database in a POC due to the events database using a table prefix.
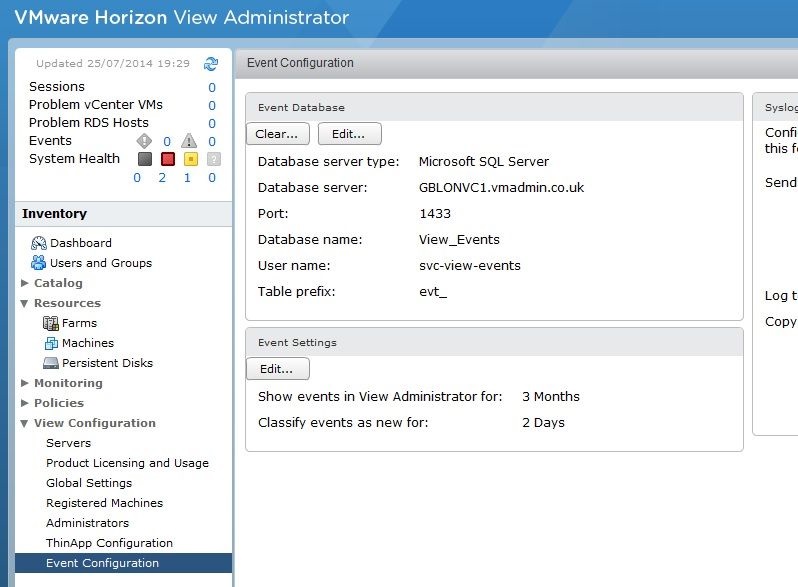
24. Confirm the event database settings have been applied.
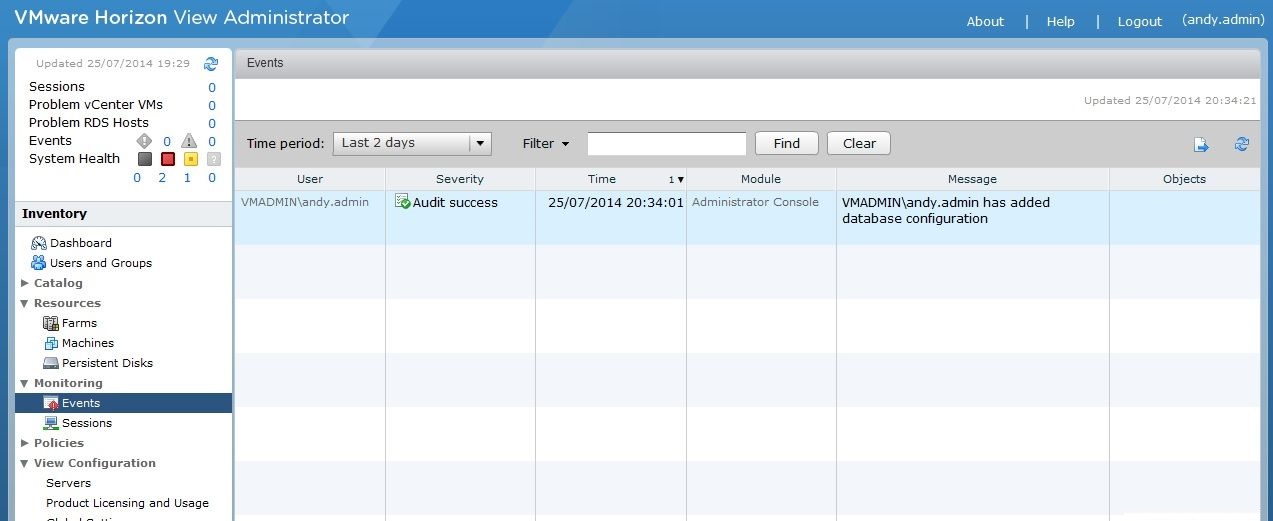
25. Go to Monitoring –> Events
All events are available from here and it is possible to filter results based on any string
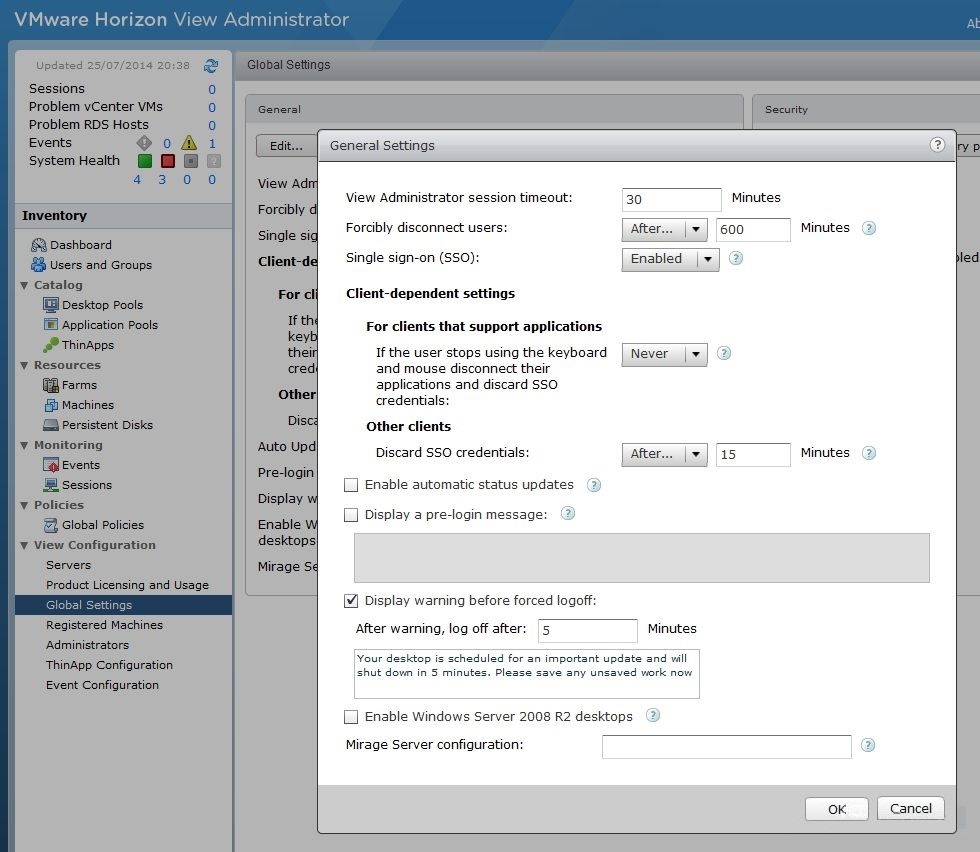
26. Go to View Configuration –> Global Settings
Click Edit under General
You may wish to increase the View Administration session timeout value to save having to re-login during longer periods of work such as when deploying new desktop pools.
Note: Here is where you can enable the use of Window Server 2008 R2 as a desktop source
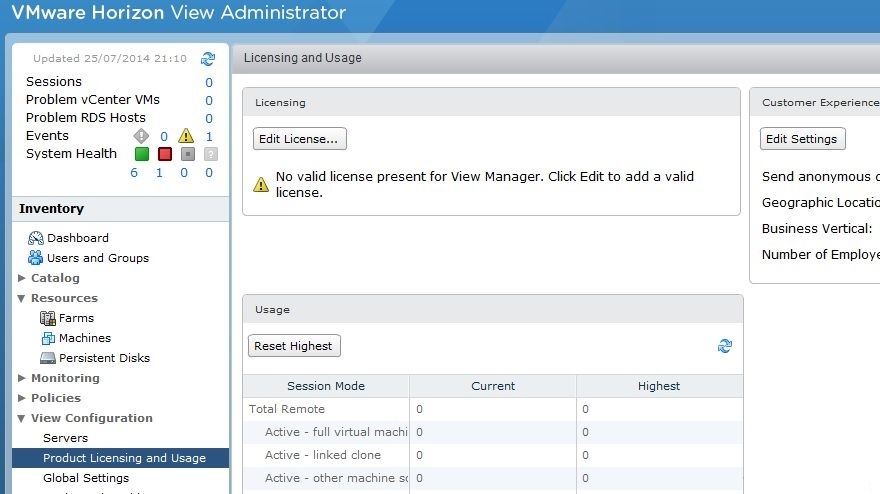
27. Go to View Configuration –> Product Licensing and Usage and enter you’re Horizon View license key.
If you do not enter a license key you will be unable to connect to desktops.
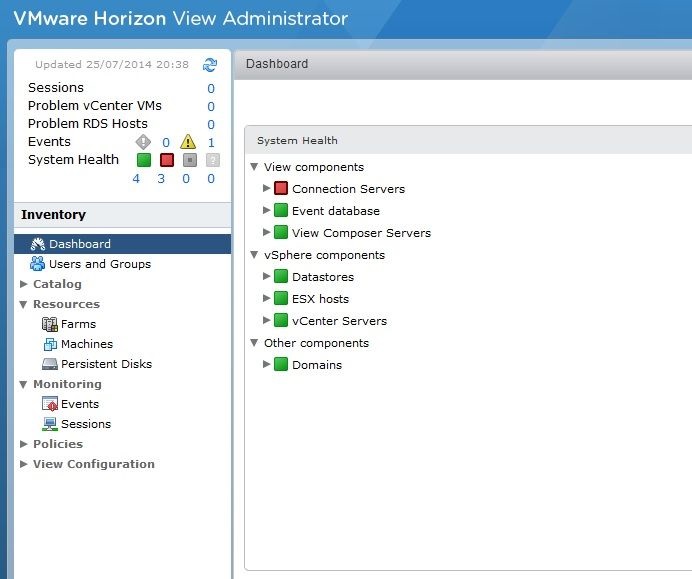
28. Looking at the dashboard view you will now see additional components under system health.
All objects should have a green status, however note our connection server will still show as red simply due to we are still using a self-signed certificate at this point.
We will change this later but it does not affect the operation of View other than displaying a warning in the system health and when connecting to the desktop (which can be disabled).
اگر شما نیاز دارید تا با کلیه مراحل راه اندازی VMware Horizon View 6.0 بیشتر آشنا شوید می توانید از مقالات زیر استفاده نمایید:
- مجازی سازی دسکتاپ با نرم افزار Horizon View 6.0 – نصب سرور Horizon View Connection
- مجازی سازی دسکتاپ با نرم افزار Horizon View 6.0 – نصب Horizon View Composer
- مجازی سازی دسکتاپ با نرم افزار Horizon View 6.0 – پیکربندی Horizon View Administrator و دیتابیس و تنظیمات vcenter و AD
- مجازی سازی دسکتاپ با نرم افزار Horizon View 6.0 – ایجاد یک Template از ویندوز 8.1
- مجازی سازی دسکتاپ با نرم افزار Horizon View 6.0 – ایجاد Automated Desktop Pool با Linked Clones
- مجازی سازی دسکتاپ با نرم افزار Horizon View 6.0 – ایجاد RDS Host و Application Pool
- مجازی سازی دسکتاپ با نرم افزار Horizon View 6.0 – ایجاد یک RDS Desktop Pool
