ایجاد و استفاده از Certificate ها در VMware View
We are getting very close to a completed VMware View solution: All that is left to consider are those pesky things called certificates. I’ve been dealing with certificate technology for nearly 10 years, and while they have come down in price since the days that Verisign and Thawte charged the earth for them, the generation and enrollment process is still fraught with administration — not least because each software vendor seems to prefer their own tools.
There seems to be a bewildering array of certificate types. In some cases documentation seems to be lacking, precisely because there are so many different ways of managing the process. For this reason, I’m going to assume you only have a passing understanding of certificates — and hope I don’t patronize too many people along the way.
Certificates are used to prove or validate the server or service you’re connecting to, with the intention of reassuring the user or customer they have connected to a genuine website. The lynch pin of certificates is the concept of trust and security. You trust the certificate offered up by https://www.hotmail.com because it was created by an “authority” you trust. In addition, your Web browser has a list of trusted root certificate authorities(the people who issue certificates) built in, including companies like VeriSign and Thawte. These authorities are meant to check out certificate applicants and revoke certificates that have been abused by rogue operators.
The trouble is they charge fees for their services and there have been occasions in recent memory where the checking hasn’t been as rigorous as it should be. The sad reality is you can still go to a secured website that takes a payment, and shuts up shop the day after. Despite the rise of ecommerce and a global financial system, consumer protection law vary greatly worldwide.
PRO+
Content
Find more PRO+ content and other member only offers, here.
The process of applying for certificates could be made analogous to the way the passport system is generally managed. The root CA authority is like the national government, this body allows for the existence of the passport office (the Certificate Issuing Authority or subordinate). It receives applications for passports from individuals who need to prove their identify to others (the certificate for the website). An application process is made by the individual and then the authority (the passport office) decides whether to allow or deny the application. The application process creates a private key, which is used for encryption purposes. This private key is like a passport application together with all the other supporting documents required to validate the request (like your birth certificate and driving license), until it is stamped or trusted by a recognized authority it remains just a fancy piece of paper. These components need to be secured because if they were intercepted it would undermine the whole application procedure.
Occasionally, a certificate can be revoked if this relationship breaks down. The certificate authority can publish what are called revocation lists denying the authority of the certificate in question. You can liken this to when an individual commits a crime, and their freedom to travel is deliberately limited. Alongside confirming the identity of the Web server in question, the certificate also allows for encryption of data packets to and from the client and the server using the “Secure Sockets Layer” (SSL) originally developed by NetScape. SSL is the S you see in https://. Many Web browsers now check the authority and validity of certificates, which you have seen countless times in ILO/DRAC/RAC boards and indeed in VMware products that use internal signed certificates for Web access and vSphere Client. Indeed, nowadays the most common reason to generate certificates that are valid is to prevent users overreacting to various warnings and error messages generated when a certificate is not trusted. In the main this is caused by lack of knowledge of what a certificate is, and the general paranoia about security of all Web servers and sites – even intranet portals. Anyway, that’s the end of the Sesame Street view of certificates — I’m now putting my bright yellow chicken suit to one side.
As you have seen the process begins with a request for a certificate, and VMware use a Java utility called keytool to make the initial request file. Despite both the Connection and Security servers being Windows based, VMware has chosen not to use Microsoft utilities for the certificate enrollment process itself.
Add Java keytool to the system path The Java keytool is available on both the Connection and Security server. It doesn’t really matter which one you use — I decided to use the Connection Server as it is on my internal network and trusted. Once the certificate request has been approved and the certificate downloaded, I will manually take it to each of my Security servers and make sure it is installed and trusted. Unfortunately, the install of neither the Connection Server nor the Security Server set up the relevant “path” statements to the Java binaries to make them work.
- Open the Windows System Properties dialog box.
- Under the Advanced tab, click on Environment Variables button.
- In the System variables group, select Path and then click the Edit button.
- In the Variable value field, shown in Figure 1, add the path to the JRE installation directory:
; C:Program FilesVMwareVMware ViewServerjrebin
- The semi-colon allows you merely to add one path after another.
- Click OK multiple times confirm your changes and exit the dialog boxes.
Generate a certificate request file
Next we need to use the keytool command to create a private key, which is used in the identification and encryption process. This file on its own would not have authority from the higher body — it would be like printing your own passport. It is never transmitted across the network and is secured by encryption and password. If the private key is compromised then the whole chain of trust and authority would be compromised.
The private key is generated by using the keytool command together with some parameters. The keytool command will also run a wizard to ask you to identify information such as:
- The FQDN of the URL used by the end-users to connect, in my case I’ve been using virtualdesktops.vi4book.com. Confusingly the keytool suggests using your “first and last name” when actually you should type the URL of your View virtual desktops environment.
- Your department and organization.
- Location (such as your town or city), state, and country. The latter must be in the form of a two letter country code that corresponds to the ISO standards. For example, in the United Kingdom you would not use UK but actually GB for Great Britain. (My country has many names and we still haven’t really decided what to call ourselves.)
- Open a command-prompt on the View Server and use cd to locate yourself at the root of C:.
- Type the command (Figure 2):
keytool -genkey -keyalg “RSA” –keystore keys.p12 – storetype pkcs12 -validity 360
- Figure 2 (click to enlarge)
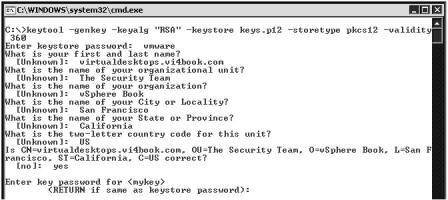
This command generates a private key using the RSA algorithm using the format of PKCS12. It is recommended you secure and backup this file in case you ever wish to recreate the certificate files again.
After hitting the enter key you will be asked for your identifying information – notice how the key file is itself encrypted and password protected to prevent it being intercepted.
- Next we will create the certificate request file. This is a file we can safelysend to root CA to request that our private key will be trusted by the root CA authority. It means at no stage must we transfer the private key to anyone external to the organization. See the CSR file as a helper file that assists in the process of having our private key stamped for approval.
keytool -certreq -keyalg “RSA” –file mycertrequest.csr –keystore keys.p12 – storetype pkcs12 – storepass vmware
This command basically states you are creating a certificate request file (-certreq) using the RSA algorithm (-keyalg “RSA”) calling the request file mycertrequest.csr, and using the private key created earlier which is used to prove the identity of the server or services held in the keystore file called keys.p12. The –storetype indicates we used the PKCS12 format, and the password used to access the private key data is vmware.
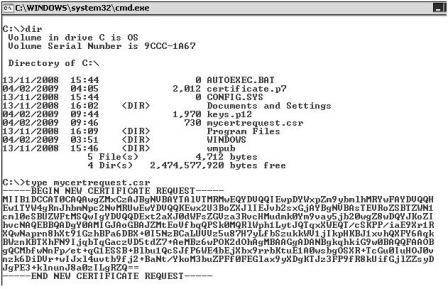
We should now have two files created in this process – one called keys.p12 which is protected and not human readable, and the mycertrequest.csr file which is text based and is viewable using a Microsoft type command, shown in Figure 3.
Submit the request to the certificate authority
There are a number of places where you could submit this certificate request – either externally to a commercially available certificate authority which will be highly trusted by nearly every web-browser and internet café on the planet, or alternatively, you could submit to an internal certificate authority which effectively limits your certificate to internal end-user only. Additionally, the request file can often be uploaded using HTTP forms, or you can frequently copy the text from —–BEGIN NEW CERTIFICATE REQUEST—– to —–END NEW CERTIFICATE REQUEST—– and then paste the string into an edit box on a form. Personally, I feel a file upload process is neater – but I have used both and it depends what the certificate authority supports. Many of the commercial certificate authorities allow you to generate a temporary test certificate which expires within a couple of days in the hope that you will later buy their services. These include:
| Thawte: | https://www.thawte.com/cgi/server/try.exe |
| VeriSign: | http://verisign.com/ssl/buy-ssl-certificates/free-ssl-certificate-trial |
| GlobalSign: | http://globalsign.com/free-ssl-certificate/free-ssl.htm |
In this example I used Thawte to generate a certificate:
- In the cmd prompt use the Microsoft Type to output the contents of the CSR file.
- Select all the text from including the words —–BEGIN NEW CERTIFICATE REQUEST—– and —–END NEW CERTIFICATE REQUEST—–
- Right-click and Choose Copy.
-
- Open your Web browser to https://www.thawte.com/cgi/server/try.exe
-
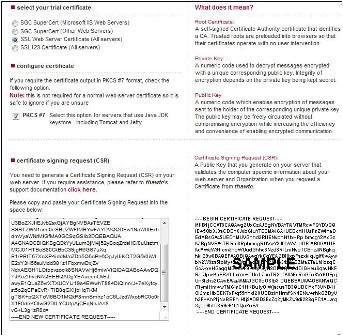
- In the Thawte page, shown in Figure 4, select the option for SSL Web Server Certificate (All Servers) and enable the option for PKCS#7 format.
- Paste the contents of your certificate request into the edit box below.
- Figure 4 (click to enlarge)
- Click Next
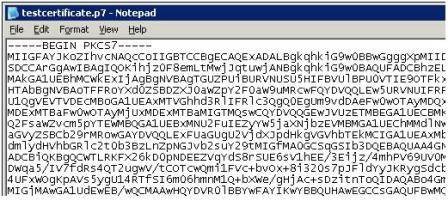
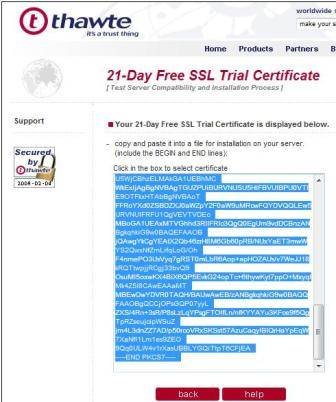
- Thawte will then generate your certificate in the Web browser, as shown in Figure 5. Create a new p7 file with notepad c:testcertificate.p7, as shown in Figure 6, and then copy the contents of the field to this file – including the —–BEGIN PKCS7—– and —–END PKCS7—– parts.
- Figure 5 (click to enlarge)
Save the file and close notepad. Finally, we will import our test certificate with keytool and then configure our Security Servers to use it.
- Type the keytool command:
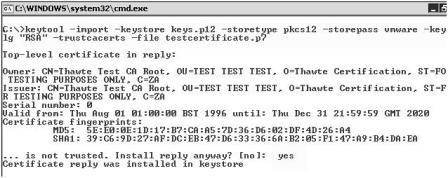
keytool -import –keystore keys.p12 – storetype pkcs12 –storepass vmware – keyalg “RSA” -trustcacerts –filetestcertificate.p7
This instructs keytool to import the private key held in keys.p12, once it is verified as being correct by the testcertificate.p7 file from the authority. Despite the appearance of trustcacerts in the string, frequently these “test” only certificate authorities are not “live” root CAs. This is done to prevent fraud and the misuse of the trial certificates, so when the import takes place you may see the message, shown in Figure 7, “… is not trusted. Install reply anyway? [no]: yes”. This message should not appear if you are carrying out the enrollment process with a proper commercial root CA.
- Figure 7 (click to enlarge)
- Next open up the locked.properties on the first Security Server, which we edited earlier to set the external URL of the system:
C:ProgramFilesVMwareViewManagerServersslgatewayconflocked.properties
- Add the two lines below to configure the Security Server for the private key together with the password to access the file correctly:
keyfile=keys.p12
keypass=vmware - Save the file called locked.properties.
- IMPORTANT:
Copy the keys.p12 file to the C:ProgramFiles VMware ViewManager Server sslgateway conf directory. - Restart the View Security Service.
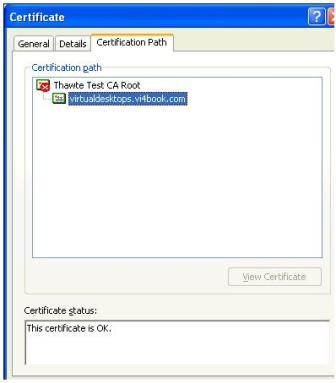
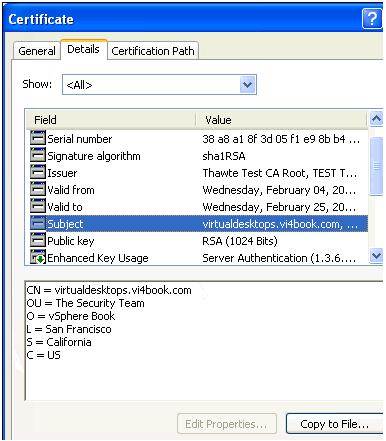
- Before we repeat some of this process on the second Security Server, you may wish to confirm this configuration. This is very easy to test. Open a Web browser to the name of the security server (in my casehttps://ss01.vi4book.com), shown in Figure 8. Your browser should allow you to see the certificate to verify its contents, shown in Figure 9, and you can use this dialog box to confirm the Security Server is no longer using its own internally generated certificate:
- To configure the second Security Server, copy the keys.p12 and testcertificate.p7 file to C:
- Set the environmental path for the keytool to C:Program FilesVMwareVMware ViewServerjrebin
- Import the certificate with:
keytool -import –keystore keys.p12 – storetype pkcs12 –storepass vmware -keyalg “RSA” -trustcacerts –filetestcertificate.p7
- Copy the keys.p12 file to C:Program Files VMware ViewManager Server sslgateway conf
- Modify the locked.properties file and add the two lines:
keyfile=keys.p12
keypass=vmware - Restart the View Security Service.

