نحوه Map کردن یک دیسک VMware برای Linux VM
Most of the VMware virtual machines are configured with few virtual disks with different size according to the project requirement. When it comes to the Linux VM , there will be a dedicated disk for the root filesystem and other disks are used for application/data. So whenever there is request for resizing the existing drive , it is very easy to figure-out with fewer disks with help of variable size. But how do you map if any VM is running with 50+ virtual disks and fewer disks are directly mapped from the SAN using RDM(Raw Device Mapping) method. It’s quite complicated thing. In this article , we will find an easy solution to map the Virtual Machine disks to Linux disks or vise-versa.
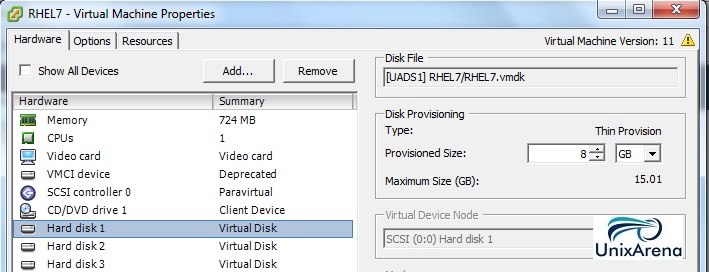
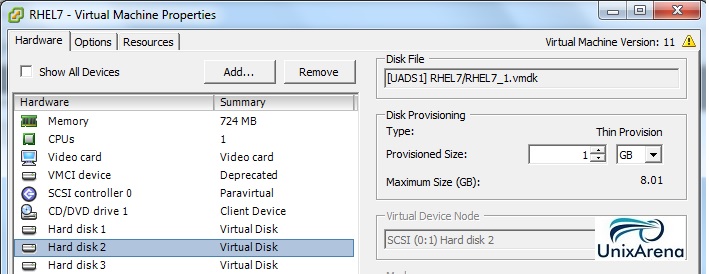
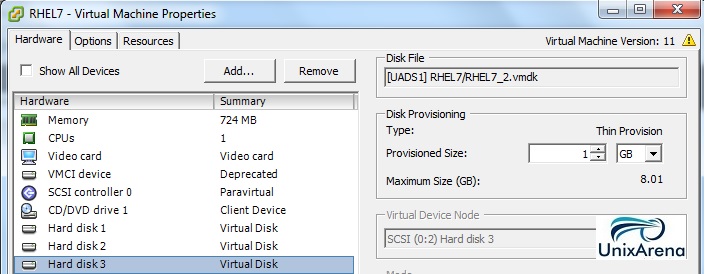
Here the my virtual Machine disks details:


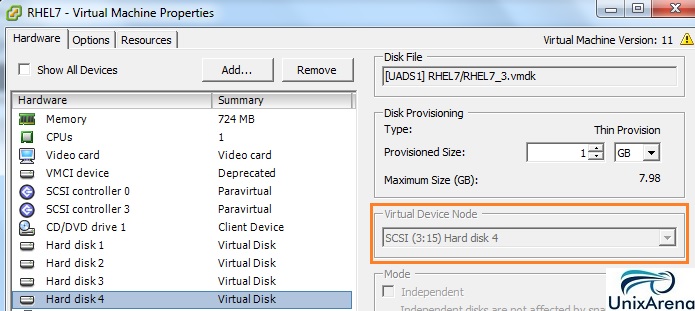
Here , I have added one more disk from SCSI controller 3.

- Hard Disk 1 – 8GB (SCSI 0.0)
- Hard Disk 2 – 1GB (SCSI 0.1)
- Hard Disk 3 – 1GB (SCSI 0.2)
- Hard Disk 4 – 1GB (SCSI 3.15)
In the Linux VM:
[root@UA-RHEL7 ~]# df -h |grep u0
/dev/sdb 1014M 33M 982M 4% /u01
/dev/sdc 1014M 33M 982M 4% /u02
/dev/sdd 1014M 33M 982M 4% /u03
[root@UA-RHEL7 ~]#
[root@UA-RHEL7 ~]# fdisk -l /dev/sda

Disk /dev/sda: 8589 MB, 8589934592 bytes, 16777216 sectors
Units = sectors of 1 * 512 = 512 bytes
Sector size (logical/physical): 512 bytes / 512 bytes
I/O size (minimum/optimal): 512 bytes / 512 bytes
Disk label type: dos
Disk identifier: 0x000c7226

   Device Boot      Start         End      Blocks   Id  System
/dev/sda1   *        2048     1026047      512000   83  Linux
/dev/sda2         1026048    16777215     7875584   8e  Linux LVM
[root@UA-RHEL7 ~]#
- /dev/sda – 8GB
- /dev/sdb – 1GB
- /dev/sdc – 1GB
- /dev/sdd – 1GB
Disks Mapping (VMware virtual machine to Linux)
From the above screenshots and Linux disks lists , we are able to map only one disk with the help of size.
- Hard disk 1 – 8GB (SCSI 0.0) (VMware ) = /dev/sda – 8GB (Linux)
What about other three disks ? How can we map it ?
1. Login to Linux VM and execute the dmesg command with “grep” function like below.
[root@UA-RHEL7 ~]# dmesg |grep -i attached  |grep disk
[ 1.465282] sd 0:0:1:0: [sdb] Attached SCSI disk
[ 1.465695] sd 0:0:0:0: [sda] Attached SCSI disk
[ 53.458928] sd 0:0:2:0: [sdc] Attached SCSI disk
[ 1818.983728] sd 3:0:15:0: [sdd] Attached SCSI disk
[root@UA-RHEL7 ~]#
2. In the above screenshots , you might seen the SCSI id’s for each disks. Just compare the VMware SCSI ID’s with Linux guest SCSI id. Apart from the no of digits , both SCSI id’s are identical and this is the easiest way of mapping the disks.
| Linux Disk Name | Linux SCSI ID | VMware SCSI ID | Size of the Disk | VMware Disk Number |
| /dev/sda | 0:0:0:0 | 0.0 | 8GB | Hard Disk 1 |
| /dev/sdb | 0:0:1:0 | 0.1 | 1GB | Hard Disk 2 |
| /dev/sdc | 0:0:2:0 | 0.2 | 1GB | Hard Disk 3 |
| /dev/sdd | 3:0:15:0 | 3.15 | 1GB | Hard Disk 4 |
But in some cases(RDM disk are assigned to VM) , the above mapping is not sufficient to map the VMware guest disks. You might require another validation prior to confirming the disk mapping.
1. Login back to Linux VM and execute the below command. Just look at the “sgx” numbers . (sg0, sg1, sg2, sg3, sg4)
[root@UA-RHEL7 ~]# dmesg |grep sg |grep Attached
[   10.220942] sd 0:0:0:0: Attached scsi generic sg0 type 0
[   10.220974] sd 0:0:1:0: Attached scsi generic sg1 type 0
[   10.221002] sr 2:0:0:0: Attached scsi generic sg2 type 5
[   53.458334] sd 0:0:2:0: Attached scsi generic sg3 type 0
[ 1818.958156] sd 3:0:15:0: Attached scsi generic sg4 type 0
[root@UA-RHEL7 ~]#
2. The “sgX” numbers will be always stays in the “N-1” to the VMware disk numbers. So just do N+1 for sgX to match the VMware Disk numbers. Let me bring up the table for you.

We have successfully mapped the VMware guest’s virtual disks to Linux OS disks. Its always recommended to perform multiple checks to confirm the disk mapping. The above testing have been performed on VMware vSphere 6.x and Redhat Linux 7.x .
Hope this article is informative to you .