مدیریت Linked Cloned Desktop Pool ها با VMware View 4
Once a linked clone desktop pool has been created you have few additional options or controls to manage them back on the main management webpage – VMware uses the term Refresh, Recompose and Rebalance to outline the three main tasks that may need to carry out with your linked clones. VMware use quite neutral sounding terms for these tasks – the words refresh, recompose and rebalance sound quite reassuring and non-intrusive. Don’t be fooled by the soft sounding words, these changes have a huge impact on users and can take some time complete depending on amount of virtual desktops contained in the pool.
- Refresh: This option resets the delta disks back to the original state. If you are familiar with VMware Snapshots the process is analogous to reverting the VM back to its original state when it was first created. So any modifications the users made to the virtual desktop would be discarded. Remember this option can also be triggered by the logoff event – so every time the user logs off, the delta disk is discarded and regenerated. A refresh can be quite an intrusive task, because if affected users are currently logged in – they will receive a message forcing them to log out of their environment. The virtual desktops are all powered off and new delta virtual disks are created.
- Recompose: In this process the linked clones attached to a new replica. The net effect is all the changes accrued in the delta disk are lost, and users get a brand virtual desktop. The recompose option can be used to roll out new software, or a new service pack – affective replacing the virtual desktop with new build – without having to create the virtual desktop pool all over again, and entitle the desktop to the correct users. A recompose can be is a very intrusive task, because if affected users are currently logged in – they will receive a message forcing them to log out of their environment and the next time they log in they may be receiving a very different desktop look and feel.
- Rebalance: This process allows you to re-allocate your virtual desktops to different location. It’s essentially a storage management option.
To refresh virtual desktops in the pool
It is possible to refresh every virtual desktop in the pool, or by selecting individual virtual desktops in the list – reset just virtual desktops you feel need it.
- In the Desktop and Pools View
-
- Select the linked clone pool
- Select the Desktop Sources Tab
At this stage select the virtual desktops that need resetting or else select no virtual desktops to reset every virtual desktop in the pool.
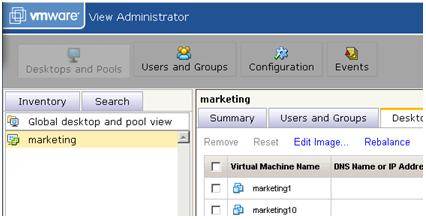
- Select the Edit Image… link (Figure 1)
- Figure 1 (click to enlarge)
- Select the option to Refresh
- Confirm whether you wish to refresh all virtual desktops in the pool or just a subset
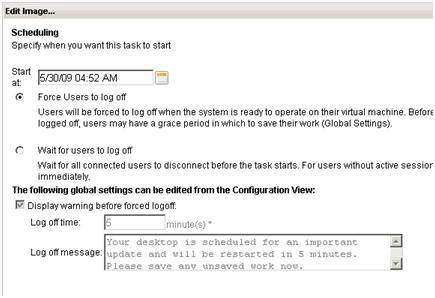
- In the final page, shown in Figure 2, you can set a date and time when the refresh happens and if you want to force users to log out, or wait for users to log out to trigger the refresh
- Figure 2
Once you click finish, you will find any desktop not in use will powered down, the old delta disks removed, and recreated – thus discarding any changes made by the end user. Users who are logged on will receive you message set in the Configuration page of the web admin tool – and will be forcibly logout after the specified period. In my tests I noticed for some reason View did not power back on my refreshed virtual desktops – and I had to power them back on manually.
Recompose a linked clone virtual desktop
There’s a number of ways to recompose a linked clone. You can either attach a brand new parent or snapshot the existing parent with new changes. Remember a recompose is essentially a quick way of pushing out a new build of the corporate desktop. I would recompose with a new parent, if I want to replace say the users Windows XP desktop with a Windows 7 desktop. Whereas I would create parent snapshot if the users were using the same operating system in the virtual desktop, but I was making a major change such as rolling out a service pack or upgrading the web-browser from one version to another. In my example below, I’m going to upgrade Internet Explorer from version 6 to 8.
PRO+
Content
Find more PRO+ content and other member only offers, here.
- Power on the Parent VM
- Login and make your changes, in my case I downloaded and install Internet Explorer 8
- Once you have made your updates, release the IP address of the Parent VM with ipconfig /release
- Power off the Parent VM, and create a new snapshot in my case I called “IE Upgrade”
- In the Connection Server admin web-page, select the Desktop and Pools View
- Select the linked clone pool
- Select the Desktop Sources Tab
- Select the Edit Image… link
- In the wizard select to Recompose
- Select All Virtual Machines
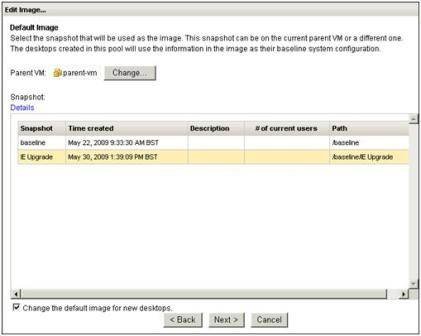
- In the next page select your new snapshot, shown in Figure 3
- Figure 3 (click to enlarge)

The large change button allows you to completely alter the base image used for the linked clone. In my case however, I’ve merely made a slight modification to the Parent VM. Remember the Parent VM can have multiple snapshots used by multiple desktop pools. This means you don’t have to maintain a separate Parent VM for each different type of desktop pool you have – just a different snapshot for each desktop pool you maintain.
Again as with Refreshing desktop you can schedule when this event will occur and View will orchestrate the whole process of login out users and then will proceed to power off each virtual desktop and delete it. Once all the desktops have been destroy, View sets about creating a brand new set of virtual desktops from a new Replica and Source based on the new snapshot in my case called IE Upgrade. During this process you should eventually see the old Replica and Source files are unregistered and deleted.
This is clearly a very intrusive task to the end-users, but saves time because you don’t have to create a new pool with new settings every time you need to make a change.

