نصب Openfiler 2.99 و NFS Share
Today’s article I’ll show you the Installation and configuration of the latest Openfiler. In fact, few days ago, a new build – 2.99 has been released. This is after very long period where no updates to Openfiler were made.
I did again choose NFS as an access protocol, since in my earlier post with FreeNAS I also used NFS. I found it easier (in FreeNAS) to configure NFS than iSCSI.. .-:) So with that said, let start the configuration process. At first again configured my home made NAS box to boot from CD/DVD rom drive and boot on the installation CD which I already burned from an ISO image I downloaded earlier from the Openfiler’s website here.
The installation process isn’t difficult to follow as you can choose the graphic or text only installation. During the installation process you choose your default language, location, DHCP (if you’re having a DHCP server or router) or fill in a static IP address, and you can choose the installation disk.
In my case I wanted too to install the Openfiler distro to my USB thumb, but unfortunately there was not enough space on that 2 Gigs USB stick and I haven’t got any other with larger capacity. So that’s why I put in my Kingston 64Gb SSD drive and I chosed this drive as an installation drive, with automatic partitioning scheme.
Here are some screenshots from the installation process (shooted from within VMware Workstation ….)
 |
 |
 |
 |
 |
 |
 |
 |
 |
As you can see, the installation graphics got some face lift… -:)
Now, when the installation is done, to be able to connect via your Web browser through GUI you must use different login/password combination than you filled in during the installation process. The default login/password combinations are:
Management Interface: https://<ip of openfiler host>:446
Administrator Username: openfiler
Administrator Password: password
Ti means that only through the console you’ll use your root password which you did setup during the installation steps.
Now when the system is up and running you must configure the RAID 5 and format a volume.
To achieve that you should follow those steps:
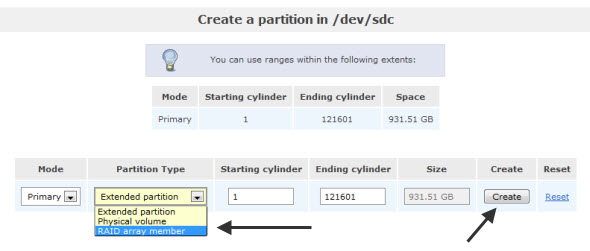
01. At first you should go to the volumes > block devices management (on the right). This should show you an image like this. In the image below I already repeated this for my first 2 disks of my future RAID 5 array.
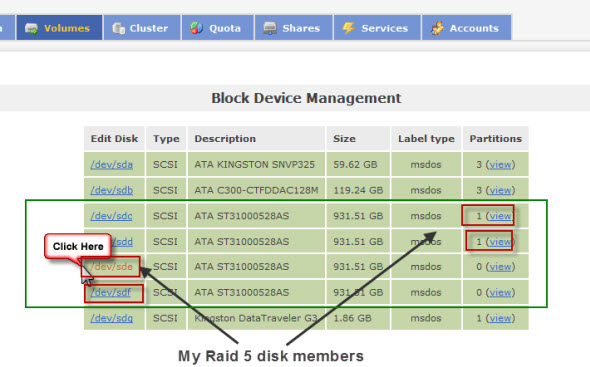
When clicking on the disk as showed on the top image, you should obtain a screen like the one below, where you can add the disk to the RAID 5 array.
