نصب Site-to-Site VPN با OpenVPN
Introduction

OpenVPN is a open-source SSL VPN client/server that allows you to set up your very own encrypted VPN. VPN’s are great for securely sharing and accessing resources regardless of geological separation, all you need is an internet connection and you can feel right at home no matter where you are. And what better way to feel secure on the road than with the winner of the 2007 Bossie Award for Best Open-Source VPN.
A Virtual Private Network (VPN) can be thought of as a secure tunnel which connects two nodes through an insecure connection (although it has other uses not related to security). This can be as simple as securely connecting a road warrior and his/her laptop back to the home office’s network or as complex as linking multiple entire networks together. In this How-To we’ll show you how to configure OpenVPN for the latter, linking up remote sites through a secure, encrypted tunnel.
Network Topology
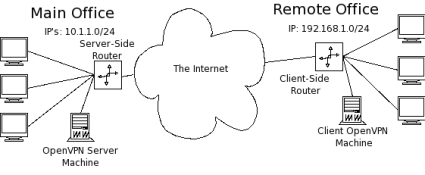
Let’s assume that we have the network topology shown below in Figure 1. There are a handful of computers on a remote network that we would like to connect securely to the main office.

Figure 1: Network Topology
To accomplish this, we can employ one of OpenVPN’s two different modes: routed or bridged. Bridging, as the name implies, simply extends the server’s network (via the OpenVPN machine) to the client that’s connecting. It’s quick and easy to set up, but has limited scalability as the network grows.
Bridging also expands the broadcast domain as broadcasts are sent through the tunnel since connected clients are assigned IP addresses in the same subnet as the server’s network. This is great for services and protocols that rely on it like SMB (Windows file-sharing) or IPX. But in a broadcast-heavy environment, that extra traffic over an encrypted tunnel can take its toll on performance.
Routing, on the other hand, is a bit trickier to set up, requiring access to both the client and server side routers. But it scales well and separates both the client network and the server network in to separate broadcast domains. This requires a WINS server to route Windows fileshare info between the two (or more) subnets.
In the topology in Figure 1, the remote office will end up being the OpenVPN client, so I’ll refer to the remote office as the “client” network, server, etc. Similarly, I’ll refer to the main office as the “server” side.
For this How-To, we’ll tackle the routed configuration and set up a WINS server to allow SMB file sharing over the tunnel. When we’re talking encryption and security, the obvious choice is Linux, which is what I’ll be using for this How To.
OpenVPN has great support for Windows too. So setting up a routed tunnel is very similar in both OSes and most of the configurations and settings that apply to Linux are fairly straightforward to apply in Windows as well. Table 1 lists the hardware I’ll use for this set up.
| Hardware | |
|---|---|
| Server Side Router | D-Link DGL-4300 |
| Client Side Router | Linksys WRT54G |
| Server Side OpenVPN Machine | •CPU: AMD Athlon 1600+ •RAM: 768 Mb •OS: Slackware 10.2 |
| Client Side OpenVPN Machine | •CPU: AMD Athlon X2 3800+ •RAM: 2 Gb •OS: Slackware 12 |
Table 1: Hardware Specs
There are some other neat options that a you can use with OpenVPN, so I’ll point those out in “Notes” as we go.
 Note: The router and OpenVPN can be on the same machine on either or both networks.
In a routed setup, each client network must be on a separate separate subnet from the server’s network to avoid address conflicts. For the setup I’ll be describing, the network subnets are shown below in Figure 2. (I’ve used the CIDR notation for netmasks below. For those unfamiliar with it, essentially 10.1.1.0/24 means the network 10.1.1.0 with a subnetmask of 255.255.255.0. The “/24” part indicates the number of bits in the prefix address.)
