پیکربندی کنترلر HP Smart Array P420i برای VSAN
I’ve been working with many customers over the last several months and found that many are very familiar with HP hardware and just know how to set things up. Others are looking for guidance from VMware on how to configure for VSAN. There are things I’ve discovered that might not be obvious but can help in the VSAN setup. Bear in mind, I am not an HP server hardware expert, so your comments are greatly appreciated.
Before I go too far, there is a bug in the HP async controller driver for the HP 420i that is included in the HP ESXi image. The bug reduces the queue depth to 28, instead of 1020, causing poor performance in VSAN.
Here’s how to check your hosts IO Controller (storage adapter) queue depth:
- Run the esxtop command on the ESXi shell / SSH session
- Press d
- Press f and select Queue Stats (d)
- The value listed under AQLEN is the queue depth of the storage adapter
To resolve, follow these directions to implement the correct driver:
HP ProLiant Smart Array Controller Driver for VMware vSphere 5.5 (VIB file)
OK, a little background/overview on I/O Controller guidance for VSAN. In general, VSAN recommends disabling Read and Write cache for any I/O Controller. Since VSAN handles Read and Write caching at the software layer, there’s no need to do it at the hardware level. Also, when destaging write cache, we want to ensure that the writes are committed to disk and not in I/O Controller cache.
In the case of the HP P420i, you cannot disable the I/O Controller cache so VSAN recommends setting it to 100% Read which essentially disables Write cache. I recently discovered that you can also selectively pick and choose which disks to enable cache for.
So, you can deselect all of the disks that will be used for VSAN, thus disabling Read cache for them. Finally, there’s an option to enable HP SSD Smart Path and enabling it can accelerate reads and writes.
<added on October 17, 2014> DO NOT “Enable HP SSD Smart Path”. Leave Smart Path disabled.
Here’s the description from the HP “Optimized solid-state drive performance with HP SSD Smart Path” Technical white paper:
“HP SSD Smart Path improves the performance of select HP Smart Array Controllers in SSD-based HP ProLiant Gen8 servers. HP SSD Smart Path technology allows I/O requests that meet certain requirements to bypass the normal I/O path involving firmware layers, and instead use an accelerated I/O operation called HP SSD Smart Path (seen in figure 1). This process accelerates reads for all RAID levels and writes for RAID 0”
Here’s a link to the full PDF details: Optimized solid-state drive performance with HP SSD Smart Path
P420i Setup Walkthrough for VSAN
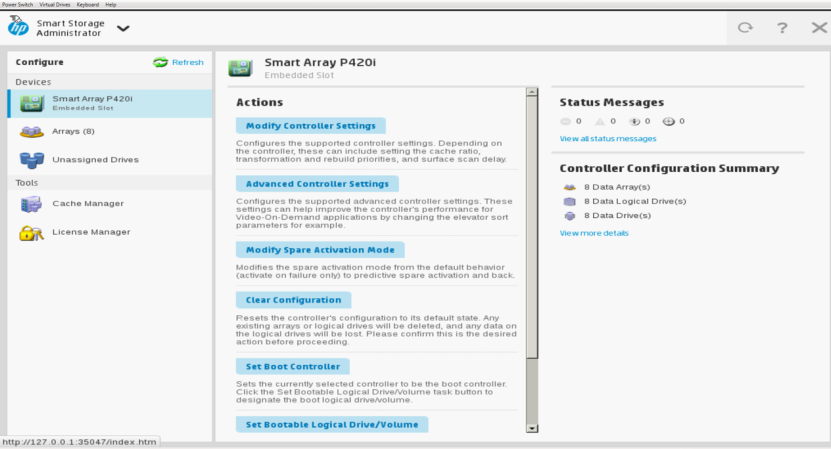
I captured some screen shots that step though the P420i setup. Here they are:
Upon booting the server, when the P420i Smart Array Controller message appears, press <F5>
Main screen
Configure –> Cache Manager
Configure –> Cache Manager –> Caching Settings
Set “Cache Ratio” to 100% Read
Make sure all the drives that are to be used for VSAN are not selected under “Select the Logical Drives for which caching is to be enabled”. In this case the 279GB drive will be used to install ESXi so caching can be left enabled for it, as indicated by the green check mark.
Leave “Enable Write Cache When Battery/Capacity Not Present or Not Completely Charged” set to Disabled
Click “OK” to save settings.
Click “Finish”
Next, we need to create individual RAID-0 disk groups for each disk drive (HDD and SSD). From the main screen, click Unassigned Drives on the left hand column, choose a single drive, and click “Create Array”.
Click “Create Array” to create individual RAID 0 disk groups for each individual disk.
You’ll be prompted for various options for this “Logical Drive”. Accept all the following defaults except you should Disable Caching. Click “Create Logical Drive”.
Review the settings and click “Finish”
Repeat the process for each disk (HDD and SSD).
When completed click on Arrays and select one that you created and it should look like this:
Selecting “Array B – 1 Logical Drive(s) –> “View More Details” shows the following details for one of the HDD’s:
Selecting “Array H – 1 Logical Drive(s) shows the following for one of the SSD’s:
Click “Enable HP SSD Smart Path”
<added on October 17, 2014> DO NOT CLICK “Enable HP SSD Smart Path”. Leave it with Smart Path disabled.
You can now exit the Smart Array Storage Administrator and reboot the host. Once ESXi is installed you will then need to tag the HDD’s as local and the SSD’s as local and SSD. This is done by going into esxcli and running the appropriate command. An example is below for HDD’s and SSD’s.
For HDD’s (MD)
esxcli storage nmp satp rule add –satp VMW_SATP_LOCAL –device <device id> –option “enable_local”
For SSD’s
esxcli storage nmp satp rule add –satp VMW_SATP_LOCAL –device <device id> –option “enable_local enable_ssd”
For more details on tagging disks check out:
Enabling the SSD option on SSD based disks/LUNs that are not detected as SSD by default (2013188)
That should do it.
If you have any comments or have had experience running different configurations successfully I’d be happy to hear them.


