فعال سازی SSO و همگام سازی با اکتیو دایرکتوری در VCP6
In no particular order I’ll start covering VCP6-DCV sections to help out folks learning towards VCP6-DCV VMware certification exam. Due to VMware recertification policy the VCP exam has now an expiration date. You can renew by passing delta exam while still holding current VCP or pass VCAP. The topic today – VCP6-DCV Objective 1.3 – Enable SSO and Active Directory Integration.
For whole exam coverage I created a dedicatedVCP6-DCV WordPress page. If you just look on some how-to, news, videos about vSphere 6 check out my vSphere 6 page. vSphere 6 grew up quite big compared to vSphere 5.5 release, but simplified the deployment and management. vSphere Web client is more present and used in this release as the legacy C# client does not allow to configure advanced configuration options and functions like SSO, FT, VSAN
You’ll need certain knowledge that we’ll try to cover today:
- Configure/Manage Active Directory Authentication
- Configure/Manage Platform Services Controller (PSC)
- Configure/Manage VMware Certificate Authority (VMCA)
- Enable/Disable Single Sign-On (SSO) Users
- Identify available authentication methods with VMware vCenter
—————————————————————————————————–
Thanks to Simplivity you can download this VCP6-DCV Study Guide as a Free PDF !!
—————————————————————————————————–
Configure/Manage Active Directory Authentication
Step 1: Connect to your vCenter server by entering the ip address you have entered during the deployment process:
https://vCenter Server IP/vsphere-client
and by using the administrator@vsphere.local as a user name and your password you have used during the deployment.
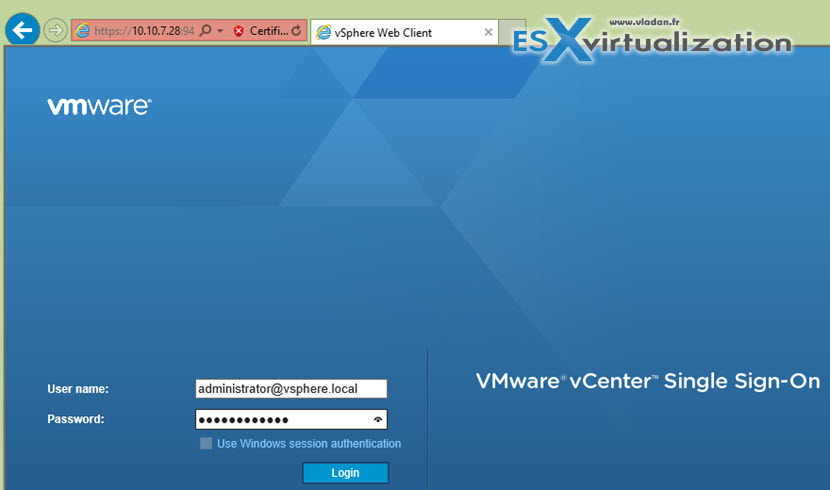
Step 2: Click the Administration button on the left and
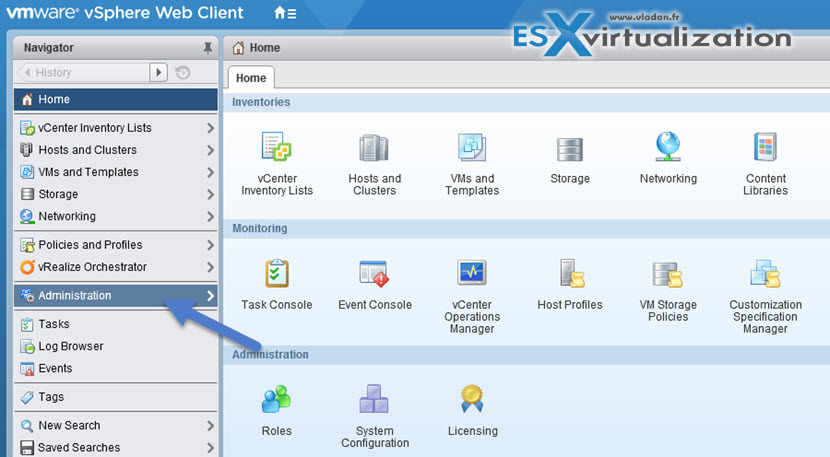
And then go to Single Sign-On > Configuration > Identity Sources > Click the “+” sign to add your AD as an identity source. Normally it will populate your local AD automatically, so you just have to click the OK button…
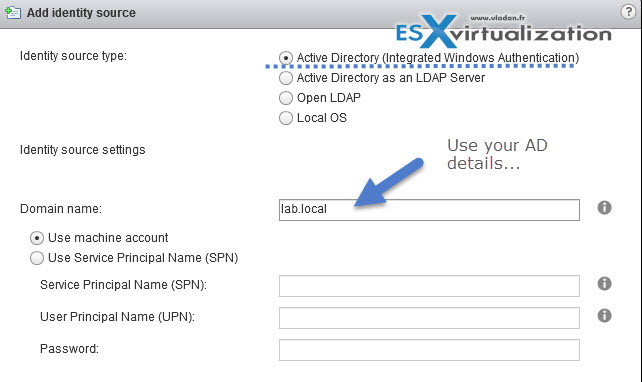
You can also click the globe icon to make the AD as the default while you’re there…
Screenshot showing the Identity source where we added our AD – lab.local
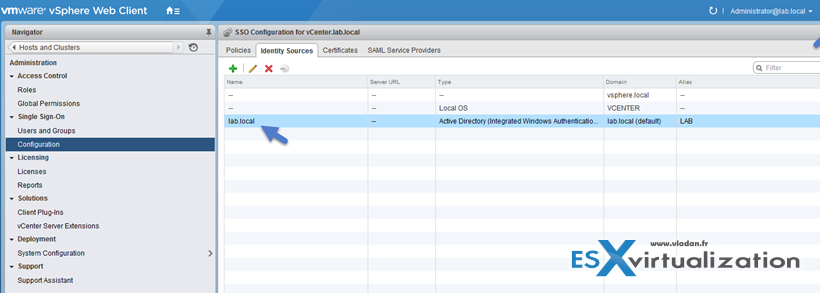
Next Step: Permissions
You’ll need to assign permissions to users which will administer the vSphere infrastructure. Usually it’s domain admin, but not always….. Also keep in mind where you assign those permissions. If it’s at the Datacenter level, vCenter level or at the cluster level… Usually you’ll want to do it at the vCenter Level.
Go to Home > vCenter Inventory Lists > vCenter Servers > vCenter.lab.local (in my case) > Click the Manage Tab > Permissions
There you click the “+” sign > Add button > make sure that you select the drop-down for your Microsoft Ad to make appear the Domain admin user…
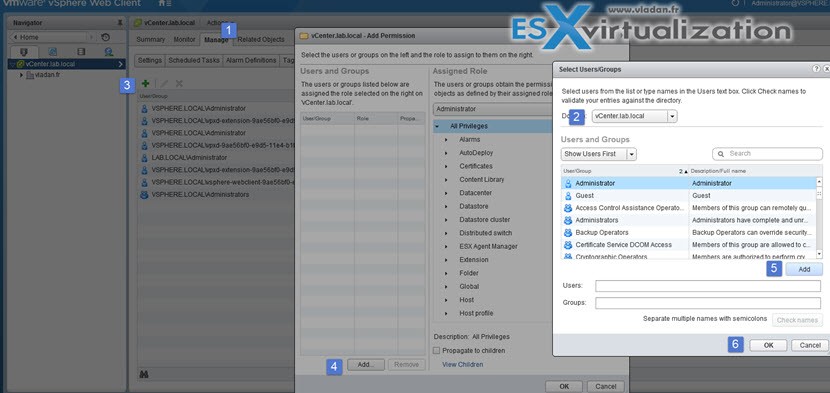
Click OK to validate. You can disconnect and connect as domain admin now… Note that in case your workstation is part of Microsoft AD, you just have to check the box and no need to enter your domain user password… -:)
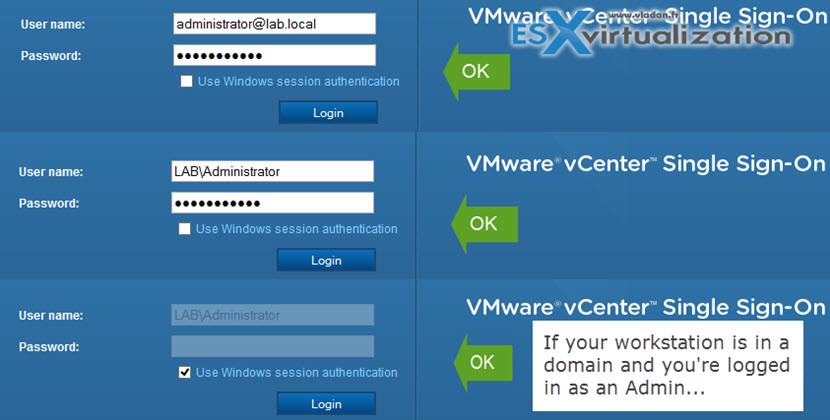
Some of you might wonder why there is this Single Sign-On. The vCenter Single Sign On is an authentication service which allows the different vSphere software components present in the vCloud suite, to communicate between each other via a secure token exchange mechanism.
Configure/Manage Platform Services Controller (PSC)
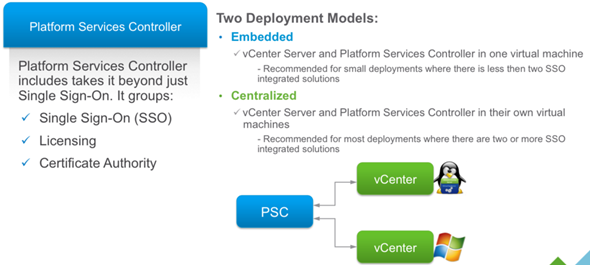
The Platform Services Controller (PSC) provides:
- Single Sign-On (SSO)
- Licensing
- Certificate Authority (VMCA)
You can deploy it on at the same time or a part and you can deploy it as Windows based or Appliance based (VCSA). It’s important to know that PSO is completely transparent working with Windows or VCSA based vCenter!
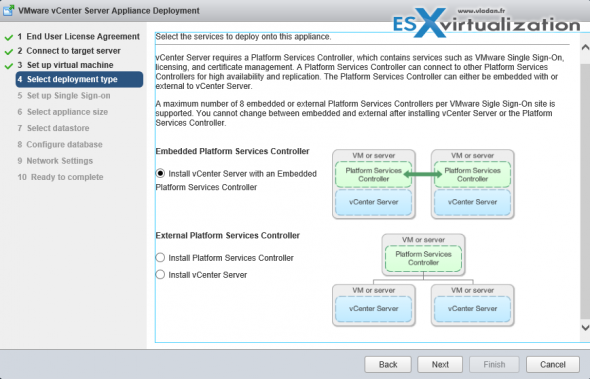
PSC Deployment Options – A two different type installation are allowed:
- Embedded (in the same VM)
- External
The embedded PSC is meant to be used for standalone sites where vCenter server will be the only SSO integrated solution. In this case a replication to another PSC is not necessary.
External PSC shall be deployed in anvironments where there is more then one SSO enabled solution (vCenter Server, vRealize Automation, etc…) OR where replication to another PSC (another site) is necessary.
Here is the screenshot from the installation process (VCSA) showing the different options and changing the options also changes the different phases of the deployment (on the left).
PSC features:
- Manages and generates SSL certificates for your vSphere environment.
- Stores and replicates VMware License Keys
- Stores and replicates permissions via the Global Permissions layer.
- Manages the storage and replication of TAGS and CATEGORIES.
- There is a Built-in automatic replication between different, logical SSO sites. (if any)
- There is only one single default domain for the identity sources.
Deployment Options:
- Embedded Platform Service Controller
All services bundled with the Platform Services Controller are deployed on the same virtual machine or physical server as vCenter Server. - External Platform Service Controller
The services bundled with the Platform Services Controller and vCenter Server are deployed on different virtual machines or physical servers.
Recommended reads:
VMware vSphere Blog – vCenter Server 6 Deployment Topologies and High Availability.
VMware KB – Recommended topologies for vSphere 6.0.x (2108548).
Configure/Manage VMware Certificate Authority (VMCA)
When you first install vSphere, the default certificates are deployed with 10 years of life span. The VMCA generates those self-signed certs during the installation process, and provisions each of the ESXi host with a signed certificate by this root certificate authority. Earlier versions of vSphere with self-signed certificates are automatically replaced by new self-signed certificates by VMCA.
There are different ESXi Certificate replacement modes:
- Default – VMCA as cert authority where VMCA issues certs for your hosts.
- Custom – you can override and do and issue certs manually via VMCA
- Thumbprint mode – this way you keep certs from vSphere 5.5
To check this go to the View Support Information after logging to your ESXi host:

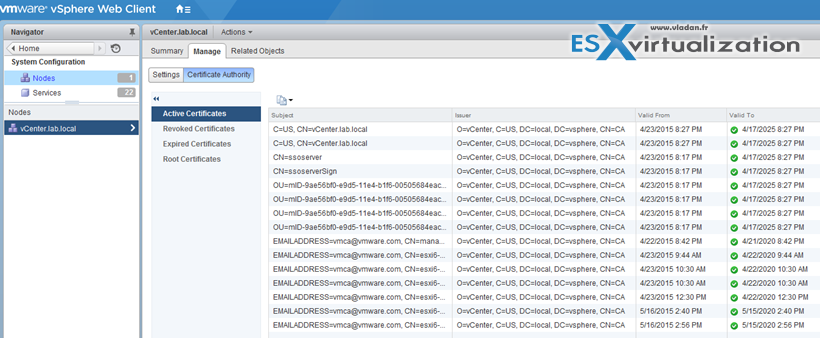
Where to check the certificates in Web client?
Home -> System Configuration -> Nodes -> Node -> Manage -> Certificate Authority
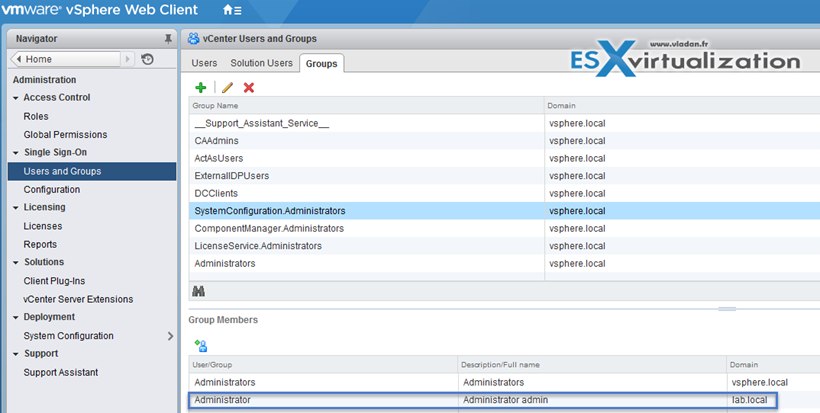
Note: If you’re not a member of SystemConfiguration.Administrators group than you might want to add yourself there. If of course you’re connecting as an domain administrator….
Back to where to check the certificates on vSphere Web Client:
Home > System Configuration > Nodes > Node > Manage > Certificate Authority
Enable/Disable Single Sign-On (SSO) Users
The VMware SSO uses different configuration policy which can be found via vSphere Web client only:
Administration > Single Sign-On > Configuration Policies
- Password Policy
- Lockout Policy
- Token Policy
Password Policy
You can configure the following parameters:
- Description – Password policy description. Required.
- Maximum lifetime – Maximum number of days that a password can exist before it has to be changed.
- Restrict re-use – Number of the user’s previous passwords that cannot be set again.
- Maximum length – Maximum number of characters that are allowed in the password.
- Minimum length – Minimum number of characters required in the password.
- Character requirements – Minimum number of different character types required in the password.
- Identical adjacent characters – Maximum number of identical adjacent characters allowed in the password.
To get to this screen You must click Administration > Single Sign-On > Configuration
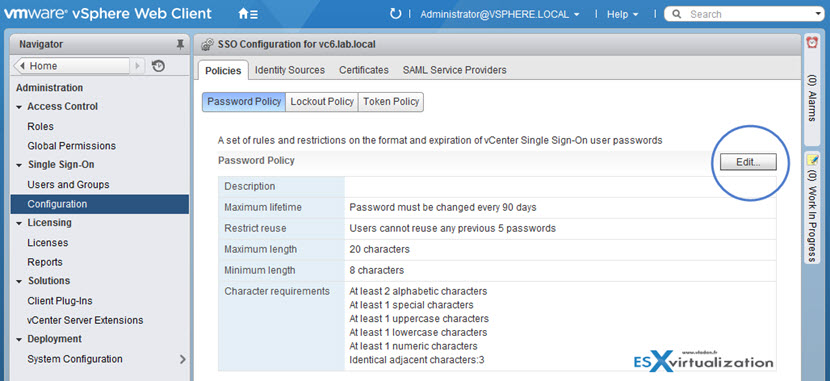
By clicking the Edit button you are able to change values there…
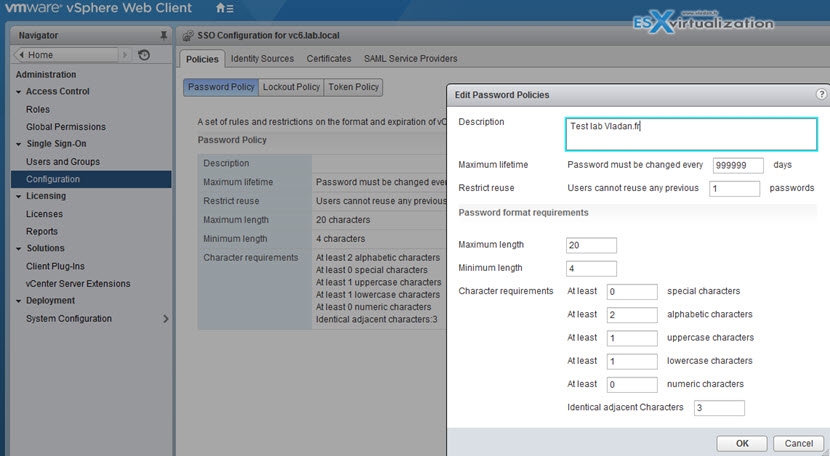
If you leave the default values and after 90 days you will want to log-in you might end up with messages saying that:
- User Account is locked.
- User Account is disabled.

Those SSO policies are pretty much the same as in vSphere 5.5, but with a difference that invSphere 5.5 we also had an administrator password expiry on the vCenter server appliance (VCSA). The VCSA 6.0 is pretty much locked out and the GUI we use to manage VCSA accessible via the port 5480 is no longer available.
Lockout Policy
Specifies the condition under which a vCenter SSO account is locked when the user attempts to log in with incorrect credentials. Five login attempts and three minutes between failures are set by default. This policy also specifies the time that must elapse before the account is automatically unlocked.
- Description – Description of the lockout policy. Required.
- Max. number of failed login attempts – Maximum number of failed login attempts that are allowed before the account is locked.
- Time interval between failures (seconds) – Time period in which failed login attempts must occur to trigger a lockout.
- Unlock time (seconds) – Amount of time that the account remains locked. If you enter 0, the account must be explicitly unlocked by an administrator.
To see the lockout policy parameters, click on the Policies tab and select Lockout Policy:
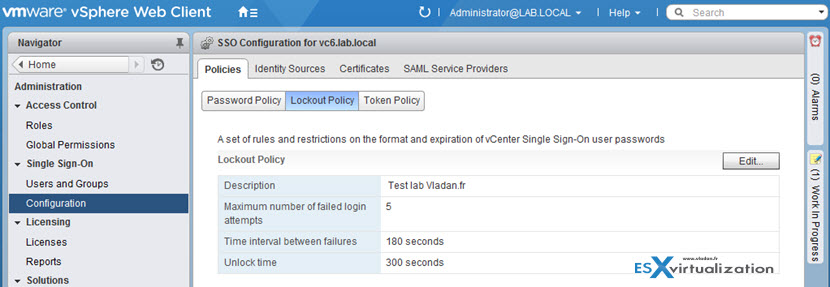
Token Policy – also interesting as for example the Clock tolerance shows time difference, in milliseconds, that vCenter Single Sign-On tolerates between a client clock and the domain controller clock. If the time difference is greater than the specified value, vCenter Single Sign-On declares the token invalid.
Other configuration options:
- Maximum token renewal count – Maximum number of times that a token can be renewed. After the maximum number of renewal attempts, a new security token is required.
- Maximum token delegation count – Holder-of-key tokens can be delegated to services in the vSphere environment. A service that uses a delegated token performs the service on behalf of the principal that provided the token. A token request specifies a DelegateTo identity. The DelegateTo value can either be a solution token or a reference to a solution token. This value specifies how many times a single holder-of-key token can be delegated.
- Maximum bearer token lifetime – Bearer tokens provide authentication based only on possession of the token. Bearer tokens are intended for short-term, single-operation use. A bearer token does not verify the identity of the user or entity that is sending the request. This value specifies the lifetime value of a bearer token before the token has to be reissued.
- Maximum holder-of-key token lifetime – Holder-of-key tokens provide authentication based on security artifacts that are embedded in the token. Holder-of-key tokens can be used for delegation. A client can obtain a holder-of-key token and delegate that token to another entity. The token contains the claims to identify the originator and the delegate. In the vSphere environment, a vCenter Server obtains delegated tokens on a user’s behalf and uses those tokens to perform operations. This value determines the lifetime of a holder-of-key token before the token is marked invalid.
Identify available authentication methods with VMware vCenter
We have already saw that at the beginning of the post. The possible identity sources can be found via web client > Administration > Single Sign-On > Configuration > Identity Sources
And we can see that there are four of them:
- AD integrated (preferred)
- Active Directory LDAP
- Open LDAP
- Local OS
Yep, you can obviously use Local OS option only if you don’t want to interconnect with your AD (for security reasons or isolation purposes).
Check How-to, news, videos and tutorials at my vSphere 6 page too or check Free VMware toolspage.
