ابتدا باید ساختار گروههای خود را در اکتیو دایرکتوری بررسی کنید. شاید بخواهید یک ساختار گروهی خاص برای اختصاص دادن کاربران مناسب به مجموعه دسکتاپهای مجازی مناسب ایجاد کنید.
دوم، ممکن است بخواهید ساختار مشابهی را در VMware vCenter از مجموعه منابع و پوشههای ماشین مجازی (VM) ایجاد کنید تا محیطهای VMware View خود را از بقیه زیرساخت مجازی خود جدا و متمایز نگه دارید.
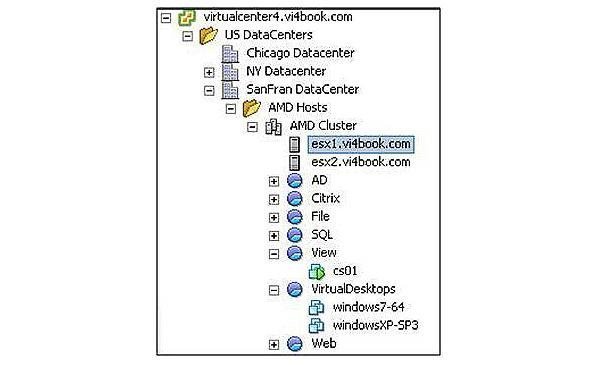
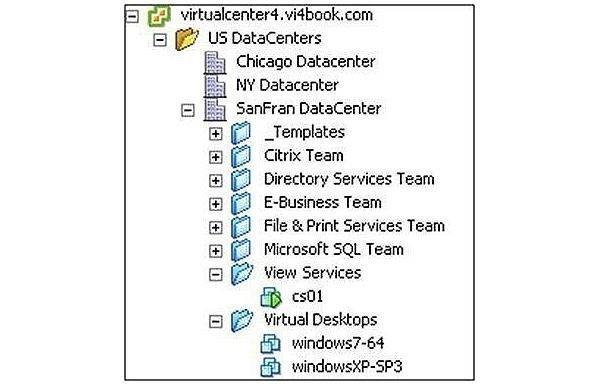
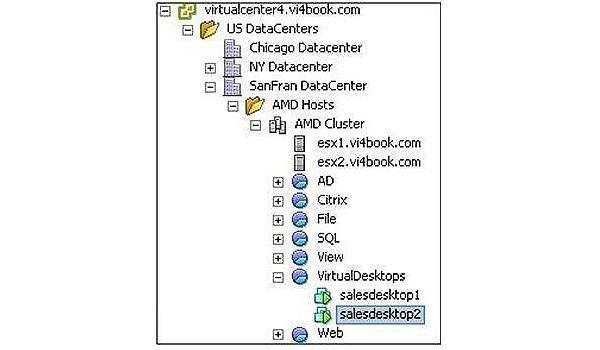
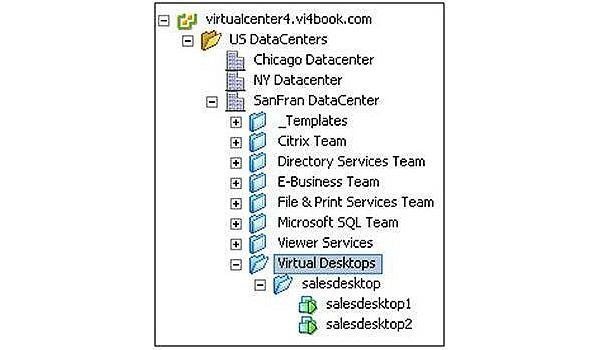
شکلهای ۱ و ۲ زیر، پیکربندی من را نشان میدهند.
نحوه انتشار یک مجموعه دسکتاپ مجازی پایدار
همانطور که در شکلهای بالا مشاهده میکنید، من برای محیط View خود هم ساختار Resource Pool و هم ساختار پوشههای VM دارم.
ویندوزهای ۷-۶۴ و ویندوز XP-SP3 دسکتاپهای مجازی آزمایشی من هستند که آنها را به قالبهایی تبدیل خواهم کرد تا اساس مجموعه دسکتاپهای مجازیام را تشکیل دهند. ویژگی مجموعه دسکتاپ از قالبها، Microsoft Sysprep و پیکربندیهای سفارشیسازی مهمان (شکل ۳) برای خودکارسازی ایجاد انبوه دسکتاپهای مجازی استفاده میکند. به همین دلیل، من همیشه قالبها و پیکربندیهای سفارشیسازی مهمان خود را آزمایش میکنم تا مطمئن شوم که آنها حتی قبل از فکر کردن به ایجاد یک مجموعه دسکتاپ مجازی کار میکنند.
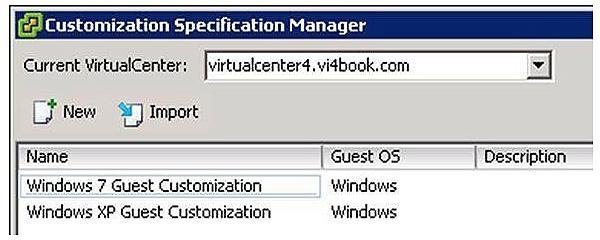
تنظیمات مهمان ذخیره شده در vCenter باید مبتنی بر DHCP باشد، در غیر این صورت نمایش داده نخواهد شد. VMware View فرض میکند که تمام دسکتاپهای مجازی شما به عنوان کلاینتهای DHCP پیکربندی میشوند.
لازم به ذکر است که قالبهای ایجاد شده برای مجموعههای دسکتاپ مجازی باید در قالب «تبدیل به قالب» باشند. آنها نمیتوانند در قالب «فشرده» که در ویزارد Clone to Template میبینید، باشند. افراد اغلب فراموش میکنند که وقتی یک ماشین مجازی را به یک قالب تبدیل میکنند، همه چیز در مورد ماشین مجازی به عنوان بخشی از قالب ثبت میشود، از جمله CD-ROMها و فلاپی دیسکهای متصل.
علاوه بر این، میتوانید یک رمز عبور برای تنظیم مجدد رمز عبور مدیر در یک Wizard سفارشیسازی مهمان در ویندوز ذخیره کنید. این رمزهای عبور با استفاده از یک کلید عمومی رمزگذاری میشوند. حساب کاربری که VMware View برای ارتباط با VirtualCenter استفاده میکند، باید به تنظیمات سفارشیسازی مهمان دسترسی داشته باشد. برای انجام این کار باید:
به صفحه وب مدیریتی سرور اتصال وارد شوید.
روی آیکون Desktop and Pools کلیک کنید.
Click the blue Add… hyperlink.
Choose the option called Automated Desktop Pool.
In the Desktop Persistence page, shown in Figure 4 below, select Persistentas the type.
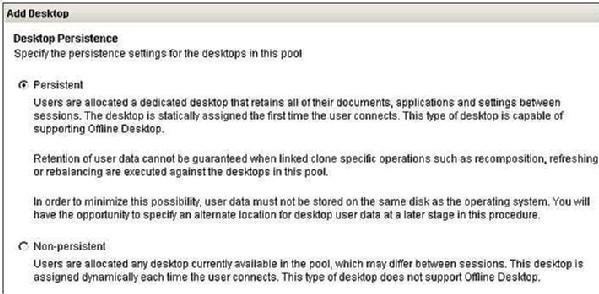
Remember that with a persistent desktop the user is randomly assigned a virtual desktop from the pool, but always returns to their personal desktop.
Choose the option called VirtualCenter virtual machine. Supports Offline Desktop.
Select the VirtualCenter which manages the virtual desktop.
Next, you must specify a unique ID for this virtual desktop together with some friendly information that workers can use to identify the virtual desktop. In my case, I set the friendly name to “Sales Groups Desktop.”
The next page allows you to control some per-virtual desktop settings related to the end-user connection.
The Automated Provisioning Page (Figure 5) controls how the virtual desktops will be created in the pool.
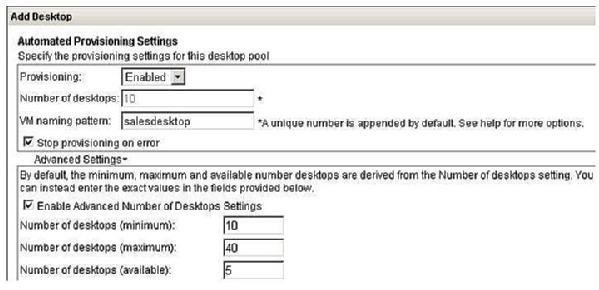
The option called Provisioning with the setting Enabled means that after clicking Finish in the Web-admin wizard, the creation of the virtual desktops in the pool will begin automatically. The VM naming pattern is used to set the NETBIOs name of Windows as the desktops are created, and also creates a folder to contain them. The Stop Provisioning on Error option will halt the creation of the pool if a significant error occurs such as running out of space in the VMFS volume.
Clicking the Advanced settings options allows you to set a Maximum,Minimum and Available setting. In my case, the absolute maximum number of virtual desktops is 40, and after clicking Finish, 10 virtual desktops will be created. Once these 10 desktops have been allocated, VMware View will create another five.
The idea of this is to create only the number of desktops you initially need (10). As your organization grows and employs new users, it will generate the virtual desktops needed (5), however because you will run out of disk or memory, you must cap this growth (40). These fields contain validation so it is impossible to set something that is illogical:
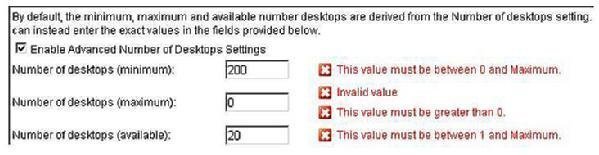
In my case, to save disk space and time, I actually used 2,10,2 for the settings.
Next, select the template (Figure 7) that will form the basis of the Persistent Virtual Desktop Pool.
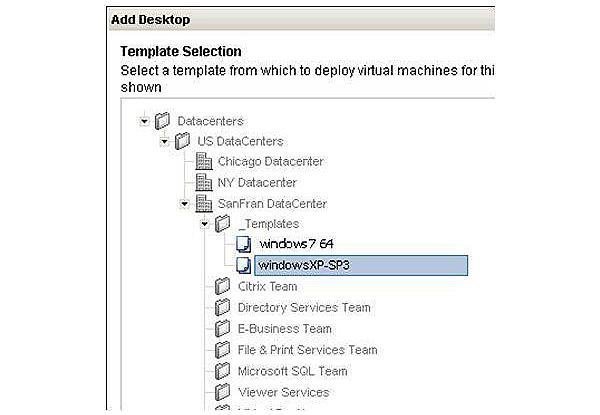
Because Windows 7 was not properly supported at the time of writing and Windows XP takes very little disk space by comparison, I used a Windows XP Virtual Desktop Template as the source of my desktop pools.
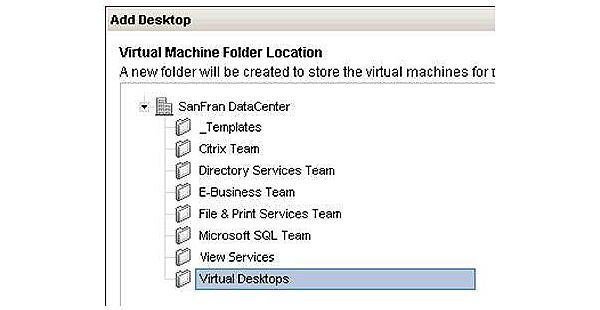
Next, select a virtual machine folder to contain your virtual desktop pool (Figure 8).
Next select an ESX Host or Cluster for the virtual desktop pool to run on (Figure 9).
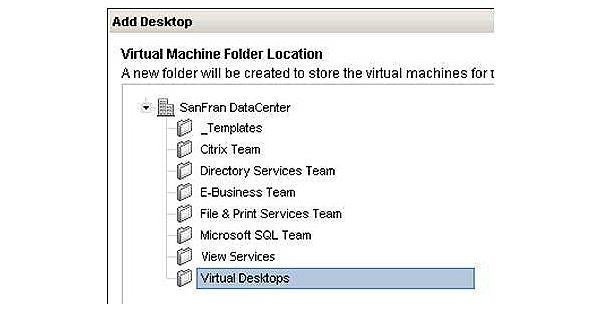
Notice how I can only see the SanFran DataCenter. This is because my template is restricted in its use to the ESX hosts in the SanFran DataCenter where it is registered.
Select a Resource Pool or Cluster where the virtual desktops will be contained (Figure 10).
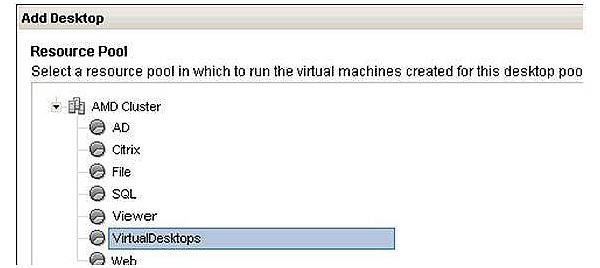
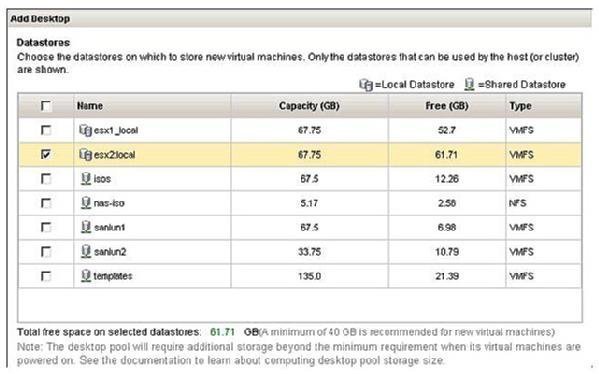
Figure 11 depicts where to select a storage location. I decided to use local storage because I don’t have SAN-based storage.
The somewhat cryptic warning at the bottom of this dialog box is a reminder that you don’t just need space for the virtual disks of the virtual desktops, but also their swap files. It is possible to select more than one datastore in this list, and if you do, View will distribute the virtual desktop across the datastores selected.
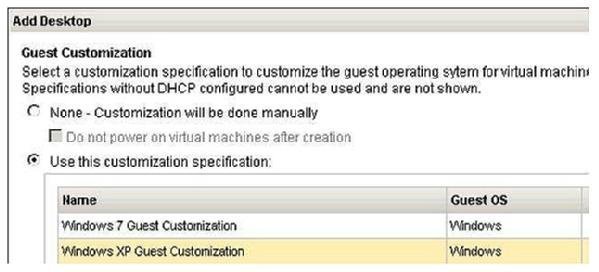
Finally,select a Guest Customization Setting (Figure 12) for the correct operating system that joins the virtual desktop to a valid Microsoft Active Directory Domain.
Clicking Finish should trigger the provisioning process and create a folder to hold the virtual desktops created in the pool (Figures 13 and 14).
Finally, set the VMware View rights to allow all the Sales Group to access the desktop.
As depicted in Figure 15, select the virtual desktop pool in the list and click the Entitlements… link.
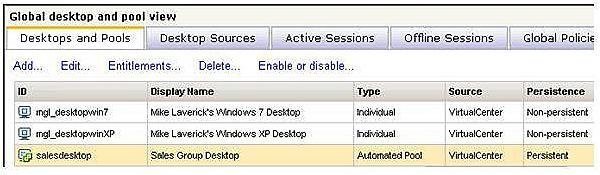
In the Entitlements pop-up page, click the Add button.
Disable the filter on Users, and Enable the filter on Groups.
Click the Find button and locate the correct group, in my case Sales Group (Figure 16).
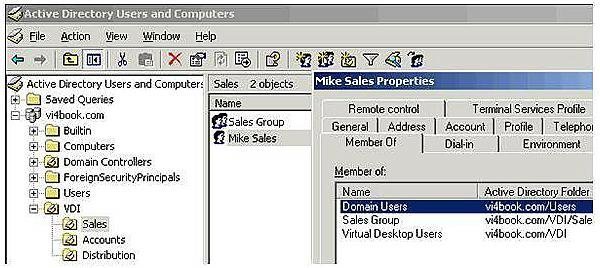
In my group model, I used the “Virtual Desktop User” group to handle the Windows rights required to make Microsoft’s Remote Desktop Protocolwork. I used the membership of a functional user group (Sales, Accounts, Distribution) to handle access to a particular desktop pool. Of course, there are many different ways to handle the group structures depending on the size of your organization and the complexity of the end-user base.
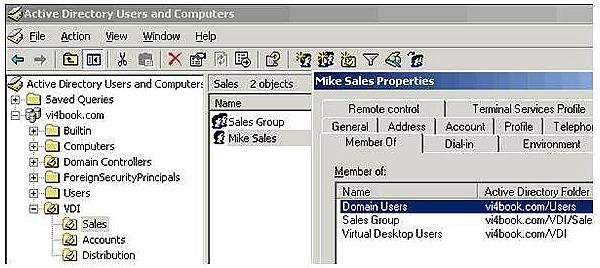
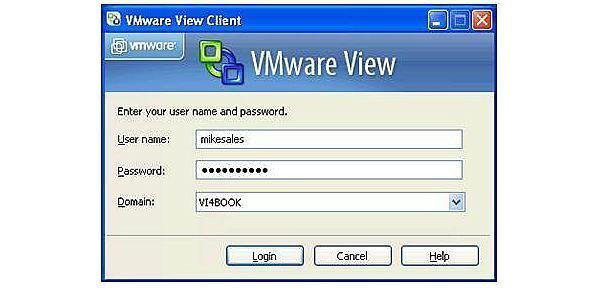
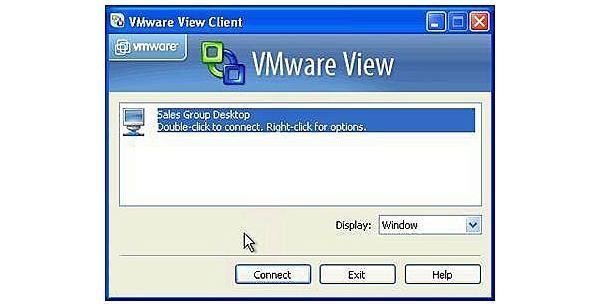
As a test, I created a user called “Mike Sales” and added him to both the Virtual Desktop User Group and Sales User Group. Membership of both groups is required in my case for this user to connect (Figures 17-19).
How to publish a non-persistent virtual desktop pool
Non-persistent virtual desktop pools are set up in a very similar way as persistent pools. They differ in one crucial respect: The user is merely allocated a virtual desktop when they log on. When they log off, we can set an option to delete their old virtual desktop.
PRO+
Content
Find more PRO+ content and other member only offers, here.
This has the net effect of giving the user a clean environment every time they log in. This can be helpful in kiosk environments, such as a school or airport. Due to their volatile nature, it is imperative that non-persistent virtual desktop users are not allowed to save files on the desktop or on the C: drive. If they do, when they log off, the data will be lost forever.
By now you are probably very familiar with the pages of VMware View Web administration, so I will keep screen grabs down to an absolute minimum in the following instructions:
Log in to the Administrative Web page of the Connection Server.
Click the Desktop and Pools icon.
Click the blue Add… hyperlink.
Choose the option called Automated Desktop Pool.
In the Desktop Persistence page, select Non-Persistent as the type.
In the Add Desktop page enable the option “Power off and Delete the virtual machine after first use” (Figure 20).
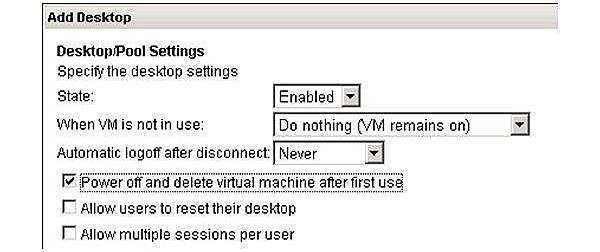
صفحه او همچنین گزینه «اجازه چندین جلسه برای هر کاربر» را دارد که در فرآیند دسکتاپ دائمی نمیبینید.
گزینهای به نام VirtualCenter virtual machine را انتخاب کنید. از Offline Desktop پشتیبانی میکند.
VirtualCenter که دسکتاپ مجازی را مدیریت میکند، انتخاب کنید.
در مرحله بعد، باید یک شناسه منحصر به فرد برای این دسکتاپ مجازی به همراه برخی اطلاعات کاربرپسند که بتوان از آنها برای شناسایی دسکتاپ مجازی استفاده کرد، مشخص کنید. در مورد من، من یک نام کاربرپسند Student Desktop تنظیم کردهام.
صفحه بعد به شما امکان میدهد برخی از تنظیمات دسکتاپ مجازی را برای اتصال کاربر نهایی کنترل کنید.
صفحه Automated Provisioning نحوه ایجاد دسکتاپهای مجازی در Pool را کنترل میکند.
در مرحله بعد، الگویی را انتخاب کنید که اساس Pool دسکتاپ مجازی غیرپایدار را تشکیل میدهد.
یک پوشه ماشین مجازی را برای قرار دادن Pool دسکتاپ مجازی خود انتخاب کنید.
در مرحله بعد، یک میزبان یا کلاستر ESX برای اجرای Pool دسکتاپ مجازی انتخاب کنید.
یک Resource Pool یا Cluster که دسکتاپهای مجازی در آن قرار خواهند گرفت را انتخاب کنید.
یک مکان ذخیرهسازی انتخاب کنید.
در نهایت، یک تنظیم سفارشیسازی مهمان برای سیستم عامل صحیح که دسکتاپ مجازی را به یک دامنه معتبر Microsoft Active Directory متصل میکند، انتخاب کنید.