آماده سازی Cluster و Host برای NSX
In the Previous Posts, We have talked about NSX Controller Deployment andValidating NSX Control Cluster status. This post we are going to walkthorugh about Preparing our Cluster and Hosts for NSX. We have configured NSX Manager and deployed Three NSX Controller. Now we have established both control and management plane. Next step is to prepare the ESXi hosts for NSX. This step is a simple tasks of few clicks to install required VIBs on the ESXi hosts.This step will install the variety of VIBS – VXLAN, distributed Firewall, Distributed Routing and user world agent into every ESXi host. You must select the entire cluster for the installer. so that it will install NSX bits on all the hosts in the cluster. NSX installs three vSphere Installation Bundles (VIB) that enable NSX functionality to the host.
One VIB enables the layer 2 VXLAN functionality, another VIB enables the distributed router, and the final VIB enables the distributed firewall. After adding the VIBs to a distributed switch, that distributed switch is called VMware NSX Virtual Switch.
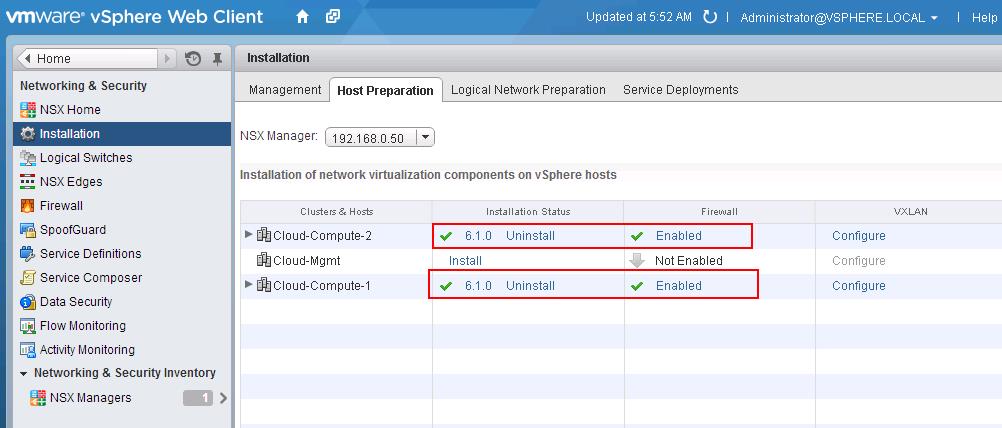
Login to vCenter Server using vSphere Web Client and Navigate to Networking & Security > Installation > Host Preparation. Choose your cluster and click the Install link.
Note: The ESXi hosts are not required to place in Maintenance mode for this installation. All my virtual Machines are running on the hosts during this installation process.
During the installation Process, You can watch the installation tasks related to the NSX in Web Client or vSphere client.
Once the installation is completed, The installation status will change with the Green Check Mark along with the NSX Version of code (6.1.0) running in the cluster along with Enabled Status for Firewall. I have prepare only 2 clusters out of 3 cluster during this demo.
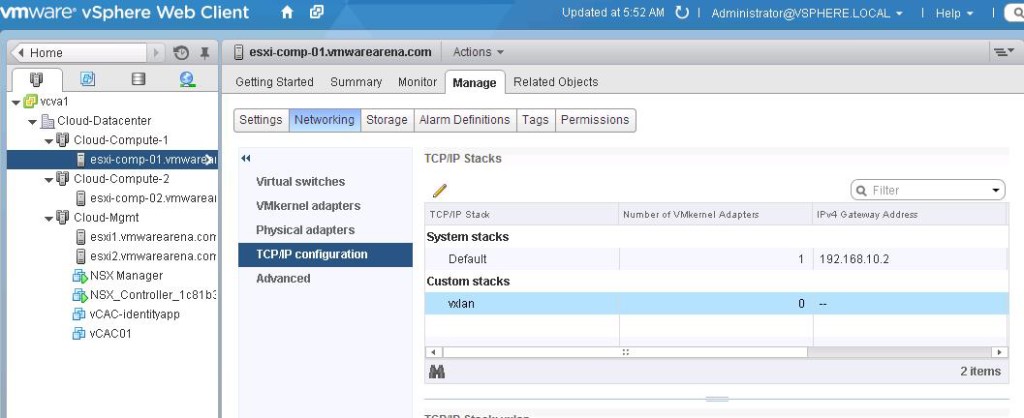
Once Cluster Preparation is completed, you can see the vxlan is loaded under custom stacks in TCP/IP configuration of the ESXi hosts.
We are done with Cluster and Host preparation for NSX. We will also verify the NSX VIB’s installation from ESXi in upcoming posts. I hope this is informative for you. Thanks for Reading!!!. Be Social and share it in social media, if you feel worth sharing it.
Other VMware NSX Related Posts:
VMware NSX Installation Part 1 – NSX Overview & Installation Prerequistes
VMware NSX Installation Part 2 – NSX Lab Design & Deploying NSX Manager
VMware NSX Installation Part 3 – Integrating NSX Manager with vCenter Server
VMware NSX Installation Part 4 – Deploying NSX Controller
VMware NSX Installation Part 5 – Checking NSX Controller Status
VMware NSX Installation Part 6 – Preparing Cluster and Hosts for NSX
VMware NSX Installation Part 7 – Verify NSX VIBs Installation from ESXi hosts
VMware NSX Installation Part 8 – Configuring VXLAN on the ESXi Hosts
VMware NSX Installation Part 9 -Create Segment ID and Transport Zones
VMware NSX Installation Part 10 – Create NSX Logical Switch
VMware NSX Installation Part 11 – Creating Distributed Logical Router
VMware NSX – Backup & Restore VMware NSX Manager Data
VMware NSX – Unable to Delete/Remove NSX Logical Switch
VMware NSX – How to Manually Install NSX VIBS on ESXi Host
VMware NSX – How to Manually Remove NSX VIBs from ESXi Host?
How to Remove NSX (Network & Security) Extension from vSphere Web Client


