اختصاص یک LUN در دستگاه EMC XtremIO
This post covers how to provision a LUN for vSphere on an EMC XtremIO brick. Compared toprovisioning the same on an EMC Symmetrix VMAX, it is very, very simple.
Summary
- Create the “LUN” (Volume)
- Create the Initiator Group with the ESXi Host HBA WWPNs
- Create the LUN Mapping Configuration to bind the Volume and Initiator Group together
- Appendix – Check the XtremIO version
- Appendix – Check the XtremIO FC/iSCSI port status
Prerequisites
- You have administrator access to the EMC XtremeIO system.
- You have EMC XtremIO version 2.4.1 with EMC XtremIO Storage Management Application version 2.4.1.
- You know your storage environment, in particular, how to zone the SAN Fabric that connects your ESXi hosts and XtremIO bricks.
Create the “LUN” (Volume)
- Open a Web Browser and connect to the EMC XtremIO Storage Management Application (Virtual Appliance) GUI: https://<IP Address/ and press the “Launch” button.
- Login as administrator (default login “admin”).
- Select the “Configuration” object and press the “Add” button in the “Volumes” section.
- In the “Add New Volumes” window, press the “Add Multiple” button.
- In the “Add Multiple Volumes” window, select the “Number of Volumes” to create, enter the “Name”, the “Size” (with MB, GB, TB designated), the “Type” (“Normal 512 LBs” for vSphere) and tick the three options (“Enable Small IO Alerts”, “Enable Unaligned IO Alerts” and “Enable VAAI TP Alerts”). Then press the “OK” button.
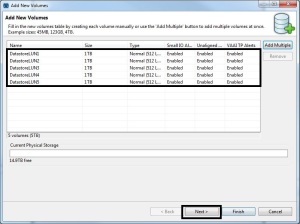
- Verify that the new “Volumes” are listed in the “Add New Volumes” window and press “Next”.
- Press the “New Folder” button and define a meaningful “Folder Name” to group the Volumes and then press “OK”. A logical folder name could be by vSphere SDRS group.
- In the “Add New Volumes” window, press “Finish”.
- In the main “Configuration” window, verify that the new “Volumes” are listed under the “Volumes” section.
- In the “Initiator Group” section press the “Add” button.
- In the “Add New Initiator Group” window, enter the “Initiator Group Name” and press the “Add” button. One “Initiator Group” corresponds to one ESXi host.
- In the “Add Initiator” window, enter the “Initiator Name” and select the “Initiator Port Address” from the drop down list. If the ESXi hosts and XtremIO FC ports have not been zoned, then you will have to manually enter the ESXi HBA WWPN. Press “OK”.
- In the “Add New Initiator Group” window, verify that the “Initiator” names are present. Perform step 12 until each HBA of the ESXi host is added. Then press the “Next” button.
- Press the “New Folder” button and define a meaningful “Folder Name” to group the “Initiator Groups” and then press “OK”. A logical folder name could be by vSphere HA/DRS group.
- In the “Add New Initiator Group” window, press “Finish”.
- In the main “Configuration” window, select the “Volumes” and “Initiator Groups” to be mapped.
- Then press the “Map All” button and then press the “Apply” button.
- Storage is now ready to be discovered and provisioned as Datastores in vSphere.
Check the XtremIO Version
- In the main XtremIO Storage Management Application window, press the “About” button.
- The “About” window will popup and list the “Version” and “Build” information.
Check the XtremIO FC/iSCSI Interface Status
- In the main XtremIO Storage Management Application window, press the “Hardware” button.
- In the “Cluster” section of the “Hardware” window, select the “SSD” X-Brick icon: “X1” to “Xn”.
- By default the “Front View” is listed, press the “Show Back” object.
- In the “Xn-SCn” part of the “X-Brick” view, the “FC” and “iSCSI” port states are displayed. If they are “RED” then the physical interfaces are not connected upstream. If the interface is “GREY”, then the “Port State” is “Up”. This can also be verified by hovering the mouse over each interface, which will also provide the “Port Address” (WWPN).
Additional Resources


