کانفیگ LDAP Authentication برای Unisphere در استوریج VNX
Whether you are configuring security for corporate compliance, or you want a central repository to manage user access, LDAP integration is becoming a major part of corporate infrastructure. Many of you may not realize this, but the VNX (as well as the older Clariion and Celerra) support LDAP integration, and after reading this blog post you will to. During this post I will cover the different steps (with pictures) required to set up LDAP authentication for VNX for FILE, BLOCK, and Unified.
*UPDATE* With the release of FILE OE 7.1 and BLOCK OE 5.32, All LDAP settings are now done in the Storage Domain section of Unisphere. Just follow the directions here to setup LDAP.
To start this process we will need a few things:
- The IPs of two domain controllers
- The “distinguished name” and password of a service account that can do an LDAP lookup
- The name of an active directory group you want to give admin access to (no spaces pleas)
- An existing administrator account on the VNX (and the root password for FILE)
Before we begin, you may want to login to the control station CLI as root and run the following command: “/nas/sbin/cst_setup –reset”. This command will regenerate the control station lockbox fingerprint and is usually required on systems where you may have changed the IP or name of the control station. I find it’s best to get this out of the way early instead of proceeding with configuration and finding it needs to be done later since this does not change any settings outside of the scope of this tutorial. More information on this can be found in Primus EMC260883.
Configuring LDAP on VNX for FILE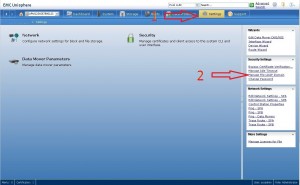
To start, we will need to login with an administrator account such as nasadmin/systadmin. You will start by clicking on the “settings” tab. On the right hand side you will see link to “Manage File LDAP Domain”, click it.
This section has several entries and is where we configure all the domain information. I have broken this down line by line as well as included a picture.
- Domain Name:
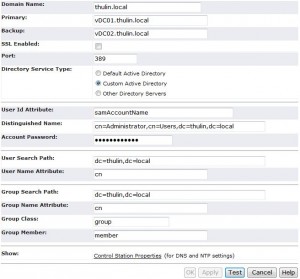
- In this area you will put in the domain name. For this example, I used my domain “thulin.local”
- Primary:
- This is where you put in the IP address of the first domain controller
- Backup:
- This is where you put in the IP address of the second domain controller
- SSL Enabled:
- Are you using SSL? If so, click the box. For this example I am not because I don’t have a certificate authority setup in the lab
- Port:
- 389 for LDAP and 636 if your using LDAPS
- Directory Service Type:
- Here you get 3 options (default, custom, and other). Default takes most of the guess work out, but will only work if the service account and all the users and groups exist in the “users” container. The custom option allows you to specify the exact container for the service accounts and the user and group search path. Other is used for non active directory setups (such as OpenLDAP servers). For this example we are using the custom option
- User Id Attribute:
- This is the attribute that represents a user in LDAP, in 99% of Active Directory environments it is “samAccountName” and we will leave it as that here
- Distinguished Name:
- This is where you put the distinguished name of the service account. For this example I just used the administrator account
- Account Password:
- If this needs explaining then I have a nice etch-a-sketch you should be using instead of a VNX.
- User Search Path:
- This is where you specify the path to search for users who will be logging in. If the user is not inside this path, they will not be granted access. I like to search the whole domain because a user cannot exist in more than one spot, and authentication won’t be effected by moving a user inside active directory
- User Name Attribute:
- This is the attribute to search by, we will use “cn” (aka Common Name)
- Group Search Path:
- This is just like above, but for groups instead. The same restrictions apply as well
- Group Name Attribute:
- Again we want to search by the common name
- Group Class:
- You want to search for the “group” class
- Group Member:
- We are searching for a “member” of a group
Once all the information has been populated, hit apply to save it (if you run into an error here, see the statement I made in paragraph 2 and start over). Once this is done we will need to test things, so hit the test button. If everything worked correctly it will say “Test Domain Settings. OK”. If you get “Bind Failed” error, either your IP, Distinguished Name, or password is incorrect. If you get a user or group error, check the search path and try again.
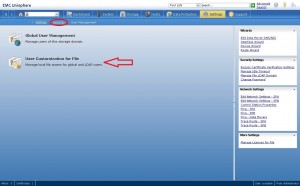
Now that we have configured our authentication protocol, we need to assign a privilege to an AD group. This is done in the in the user management area, so go back to the settings tab, then click on security, then click on user management, and finally “User Customization for File”. This area will present you with 3 tabs: Users, Groups, and Roles. Click on groups and then click create at the bottom. You will now be presented with a screen to make a new group and map it to LDAP.
- Group Name:
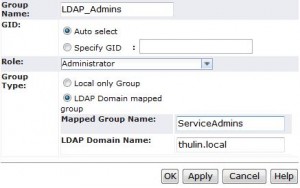
- This is a local name for the group. You can call it whatever you want because it ONLY exists on the VNX FILE control station. I chose the name LDAP_Admins
- GID:
- This is where you can specify a GID or just have the system auto select one. I use the default of auto select
- Role:
- This is where you give permissions to the group based on the role. Any user in this group will be given this role/permission level by default. For this example, I chose to give the users the Administrator role.
- Group Type:
- This is where you would select “LDAP group mapped” and put in the name of the group (in this case serviceAdmins) and the domain name (thulin.local). The group name can’t have any spaces but does support underscores.
At this point all the work on the VNX FILE side is done and it’s time to start on the BLOCK side.
Configuring LDAP on VNX for BLOCK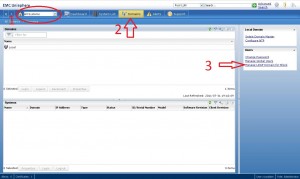
Setting up LDAP for Block is very similar to the way it was done on the Clariions. Just like with the File side, you will need the same 4 bits of information. To begin, click on the home button in the upper left, then click on the domain tab, and finally click on “Manage LDAP Domain for Block”. This will bring up a window where we can start configuring our LDAP settings. The block side requires you to setup individual domain controllers, and set all the settings on that one server, so click on the “add” button and we’ll get started. You will see several areas to input information and I will go through them:
- IP Address
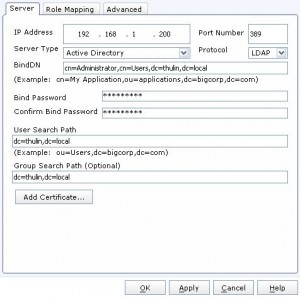
- This is where you put in the IP of the domain controller
- Port
- 389 for LDAP, 636 for LDAPS
- Server Type
- There are two options: LDAP Server and Active Directory. Make sure to choose “Active Directory” if you’re using an AD environment (most of you will be doing this)
- Protocol
- LDAP or LDAPS
- BindDN
- This is where you put in the Distinguished Name of the service account just like when setting it up for file.
- Bind Password
- Password for the service account
- Confirm Bind Password
- Make sure it matches
- User Search Path
- Just like with File, this is where you would set the search scope to find your users
- Group Search Path
- Just like with File, This is where you set the search scope to find your groups
- Add certificate
- This is where you would upload a root CA certificate for LDAPS. Make sure it’s in base64 encoding
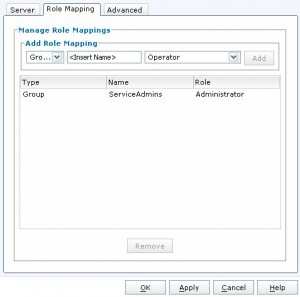
After you have put in all this information, click on the “Role Mapping” tab so we can map an AD group. Once in there you will want to select “Group” from the first pull down. Put in the name of the AD group (in this example I used “ServiceAdmins”), then select the Role from the second pull down (in this case I selected Administrator), and finally click “Add” to add the mapping. Once you have all your mappings, click ok and wait for the confirmation message. Then you want to do this all over again for the second domain controller. Once you have this all set, click “Synchronize”. And that is it!
Configuring LDAP on VNX for UNIFIED
Configuring LDAP for a unified box is no different than the Block and File side. The only thing you need to remember is that you need to do both, because the authentication will check your LDAP account against both the control station and the service processor. Both configurations will have to be working correctly to login properly.
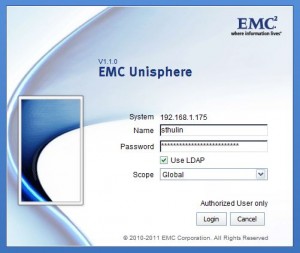
Now it is time to test your LDAP login. Logout of Unisphere by clicking the door icon in the upper right. Open Unisphere again and this time put in your AD username and password. Be sure to select “Use LDAP” and click on “Login”. If all your configuration is correct, you will be brought back in to Unisphere. If you get an access denied message, check you username, password, as well as your user and group search paths.
*UPDATE*
I have included a youtube video published by EMC that shows exactly what I have demonstrated above.
